Beginner (Unrated-999)
Simple Checkmates
The basis of all endgame knowledge is knowing how to administer different checkmates against a solitary King. Besides being a key to endgame knowledge, it is also an important feature in your middlegame-playing ability: if you have extra material on the board (say, a Rook), a simple but effective plan will be to gradually exchange off the other pieces until you are left with the possibility of a clear checkmate.
King, Queen and Rook vs King
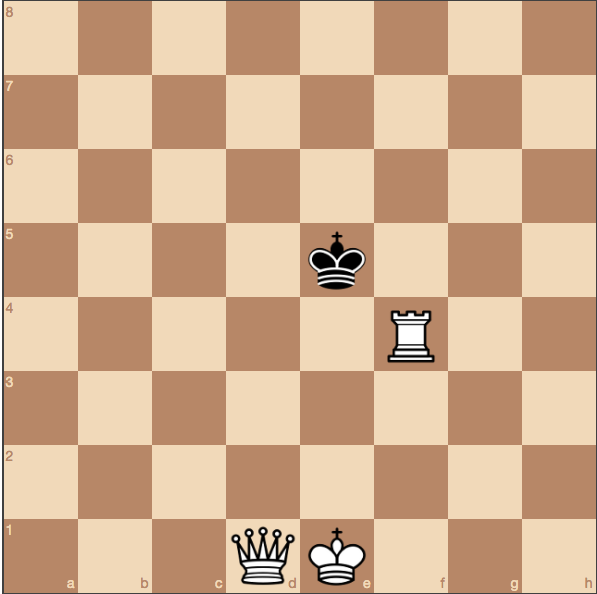
Queen and Rook work together towards a quick checkmate.
If you are lucky enough to find yourself with this overwhelming advantage, it’s important to know how to make good use of it. Crucially, you have to be careful not to stalemate the opponent’s King (that is, leave the opponent in a position where he’s got no legal moves available and can therefore claim a draw).
Click here to practice this ending against a computer.
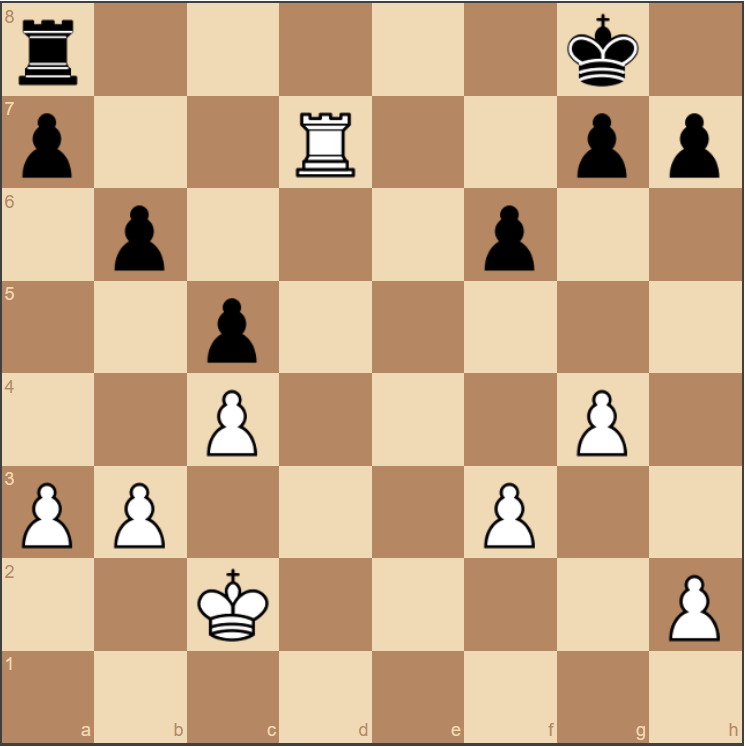
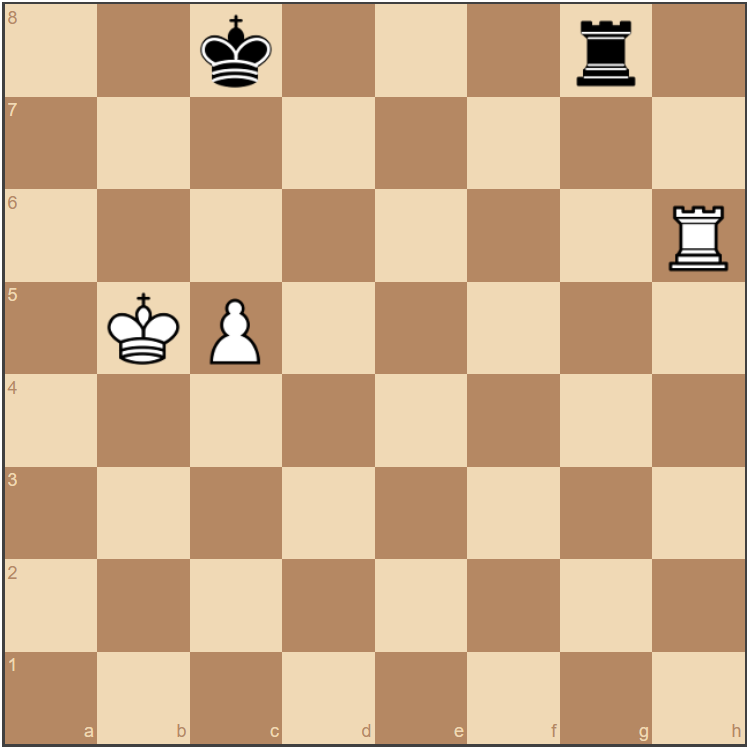
King and Two Rooks vs King
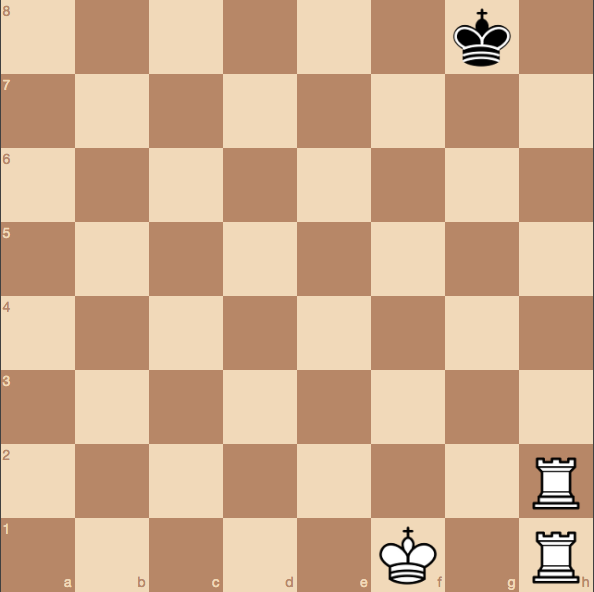
The two Rooks show great teamwork in checkmating the black King
It’s not uncommon for relative beginners to find themselves in this situation, but during actual play it may take too long to figure out the best way to mate. If you take a moment to learn the “ladder” method, you can make sure that any such endgame will be led to a speedy conclusion.
Click here to practice this against a computer
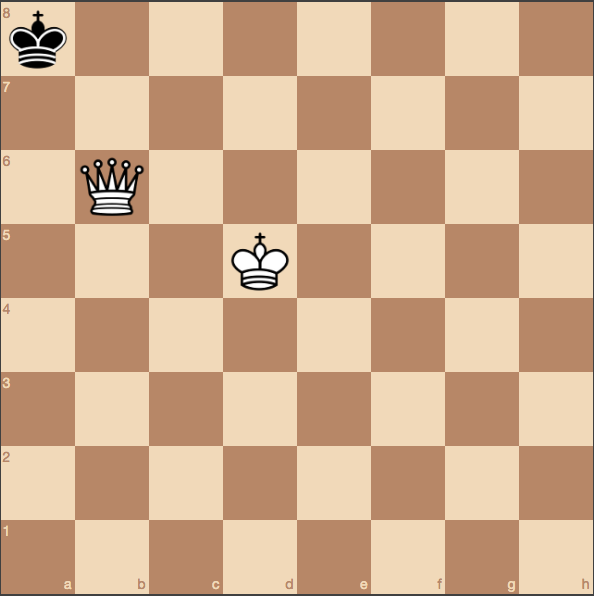
King and Queen vs King
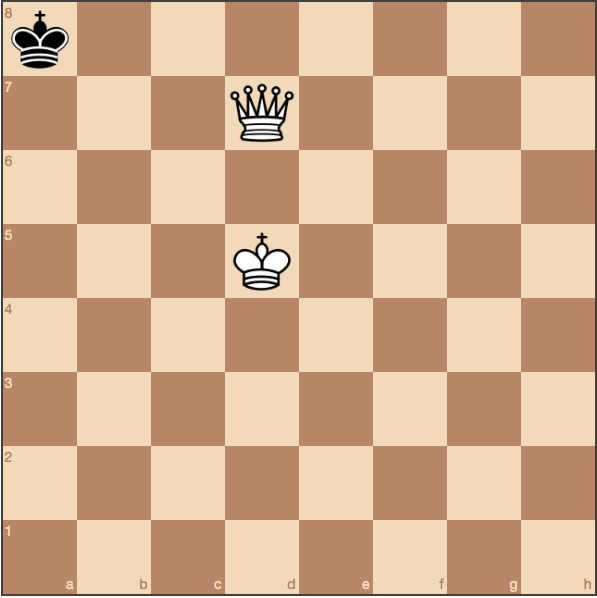
Key here is not to stalemate the black King: always make sure he has a square to go to
Most King and pawn endgames are based on knowing how to checkmate with Queen and King, making sure that you know what to do with that pawn you’ll be trying to promote. Key here is making sure that you don’t stalemate the opposing King all while gradually trapping him towards the edge of the board. This checkmate, together with the King and Rook vs King ending, is absolutely essential.
Click here to learn this endgame through an interactive, step-by-step tutorial.
Click here to practice this against a computer.
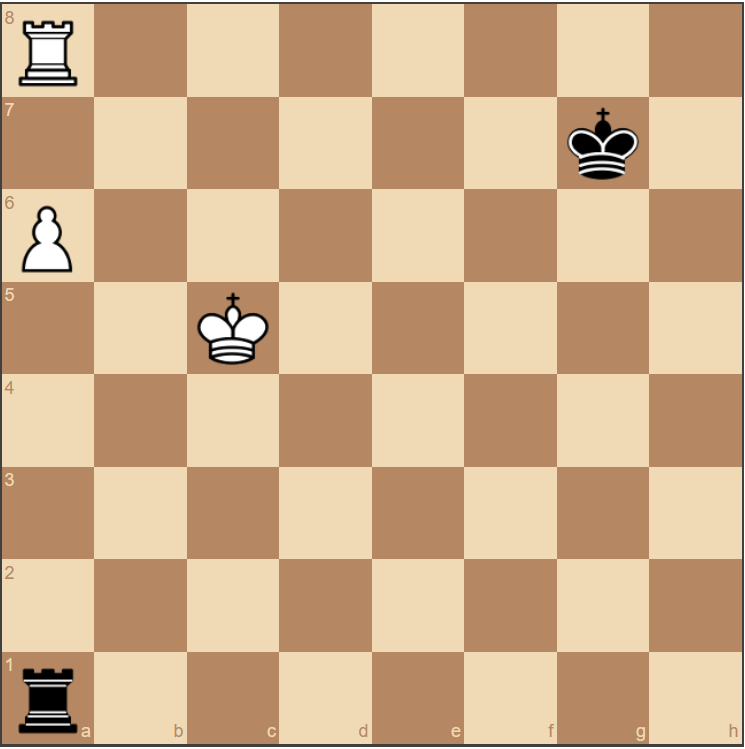
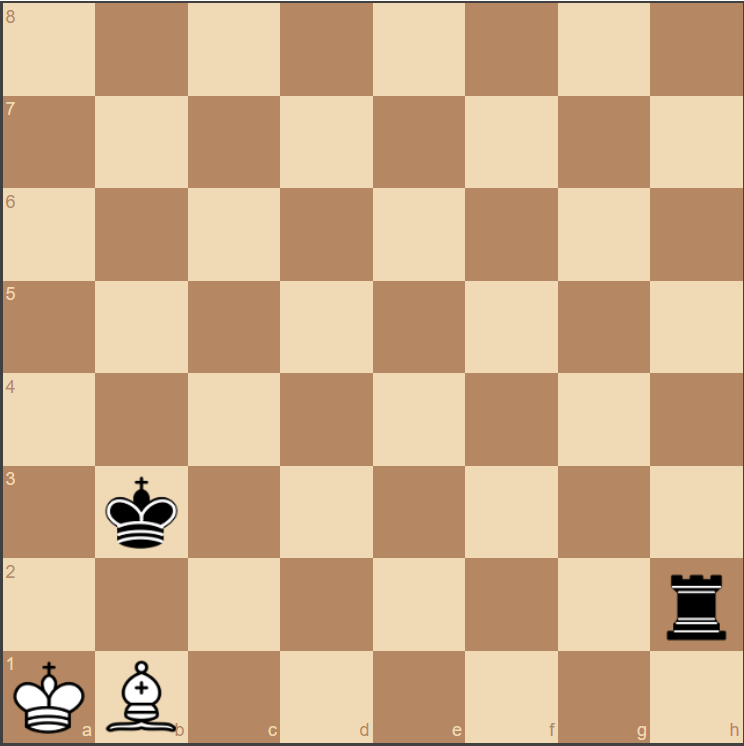
King and Rook vs King
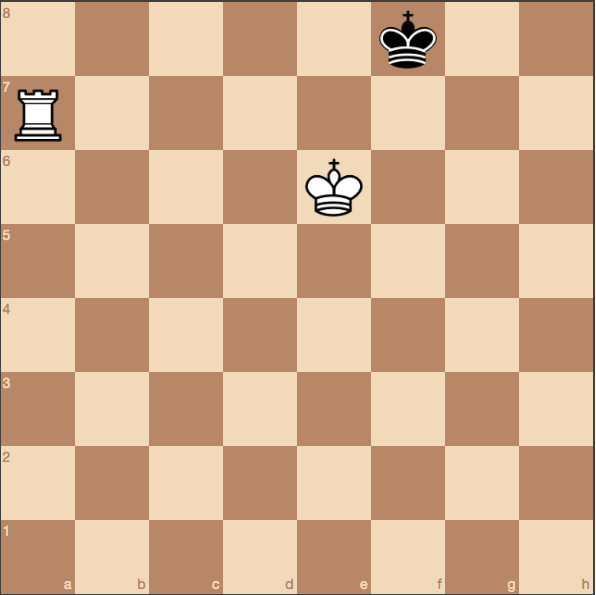
After closing off the black King in the eighth rank, white can bring the checkmate about
King and Rook endgames are even more important to learn, since it can be hard to find out during an actual game how to give this checkmate and you don’t want to miss the chance for a victory. But a mere few minutes dedicated to this ending will be enough to ensure that you bring the most out of the King-Rook duo.
Click here to learn this endgame through an interactive, step-by-step tutorial.
Click here to practice this against a computer.
Avoiding Stalemates
As already mentioned, a key factor in all these endings is to make sure you don’t stalemate the opposing King, thereby jeopardizing what would be a winning advantage. Of course nothing substitutes paying attention during actual play, but knowing the positions where stalemates are more likely to happen will help you play these endings faster and more confidently.
Corner stalemate
Black is stalemated, so white must move the Queen back before bringing the King to help checkmate.
This stalemate happens so often that it’s worth knowing and paying extra attention to it. Usually the winning side causes it by pursuing the King too far, in the heat of the moment and often under time pressure. So just remember to always allow a couple of squares for the opponent’s King.
Click here to practice this against a computer.
Class E (1000-1199)
Going from Beginner to Class E, your endgame has already improved quite a bit. You are now fully aware of the relative value of simple piece combinations (Queen and Rook, or two Rooks, say) and can give all the basic checkmates. You begin to understand the roles that different pieces play, as well as some other key positions that tend to happen a lot in practice. You learn your first pawn endgame notions.
Understanding other pieces’ roles in endgames against a lone King
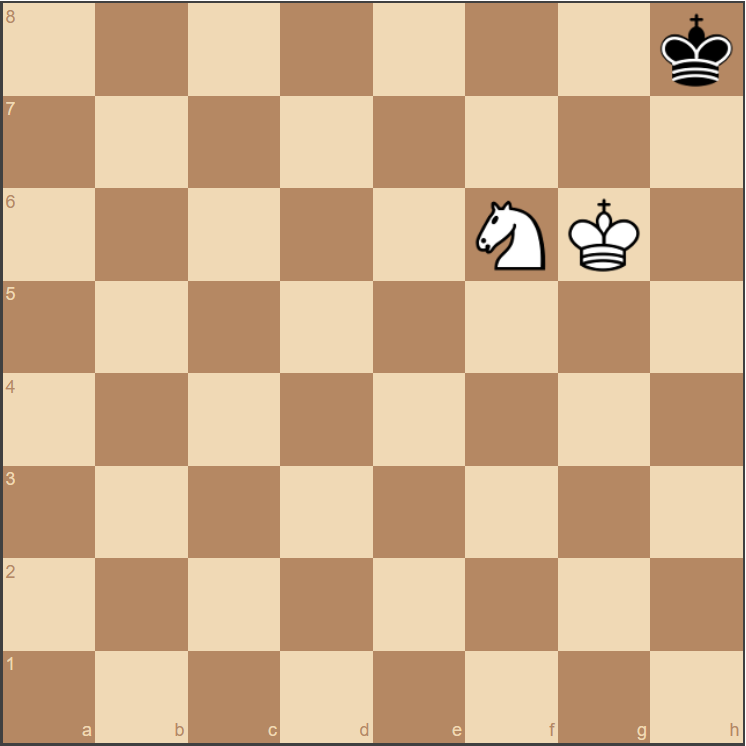
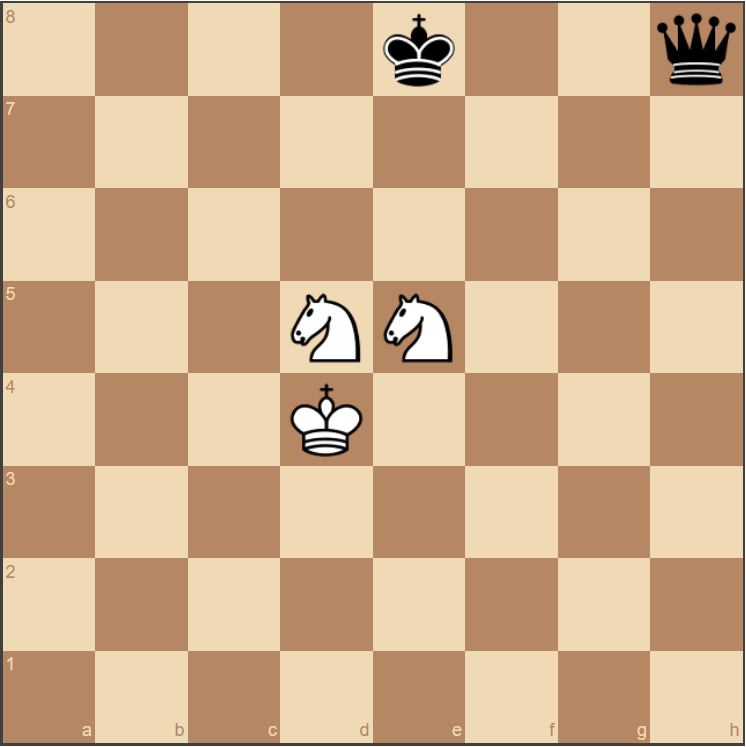
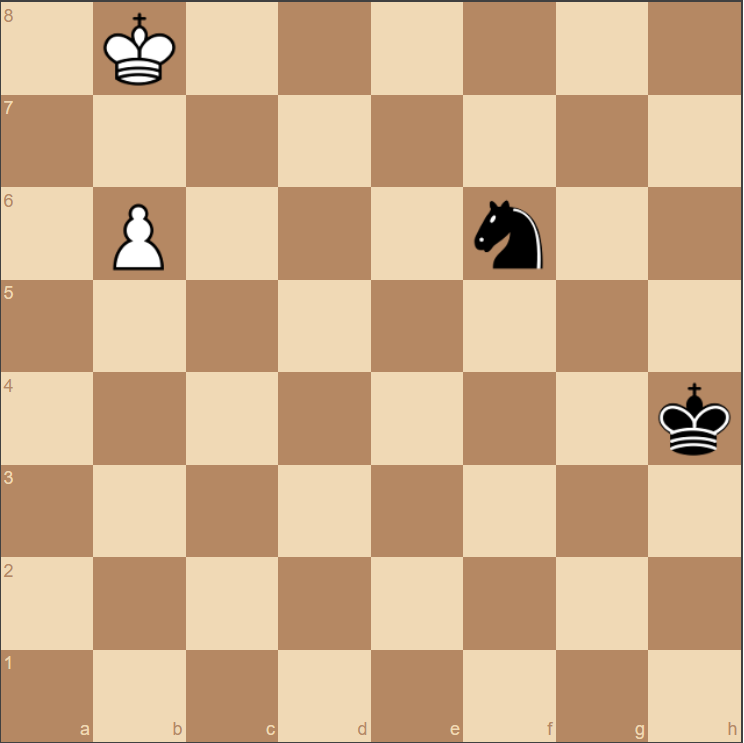
King and Two Knights against a lone King is a draw
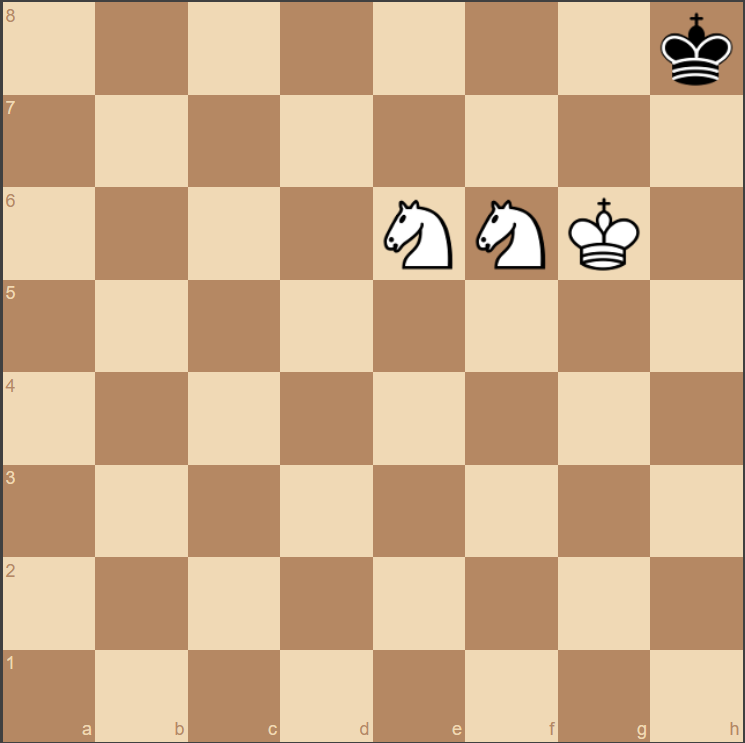
Two Knights cannot checkmate a lone King.
Being up two Knights in a simple endgame is an overwhelming advantage — technically two Knights add up to more than a Rook’s value —, but unfortunately not a guarantee of victory. In fact, it’s impossible to force a checkmate with two Knights against a King. A self-mate exists, but can only happen if the weaker side’s King walks into a corner square (a1, a8, h1, h8) in a given situation. However, the weaker side is not likely to do so, as there will always be the option to walk away from the corner.
King and Two Bishops against a lone King can win
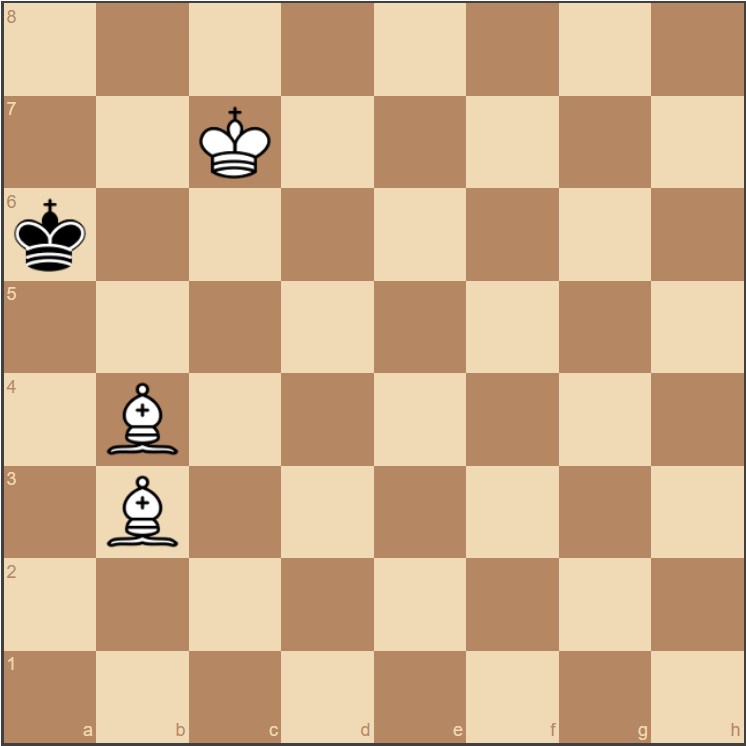
The Bishop roll is often the final coup in the Bishop pair vs King battle.
This is a winning combination and the checkmate can be achieved. The precise method is hard, and will be learned at a more advanced stage, but it is important to know that the win is possible.
King and Knight + Bishop against a lone King can win
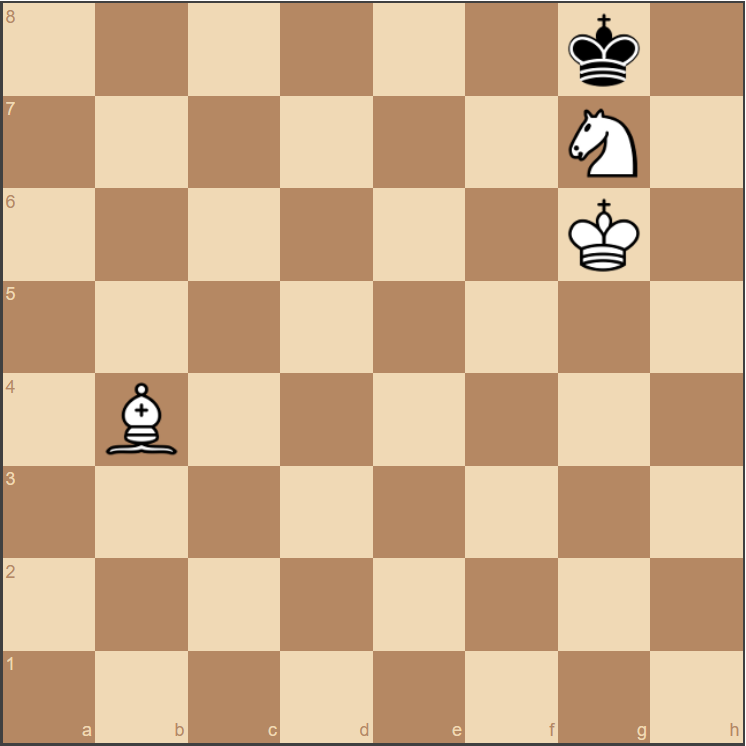
A difficult endgame to learn, but one with showcases the beautiful cooperation between light pieces.
The method for winning is harder than the two Bishops’ one, but one should know that the win is possible. This endgame will also be dealt with at a further stage.
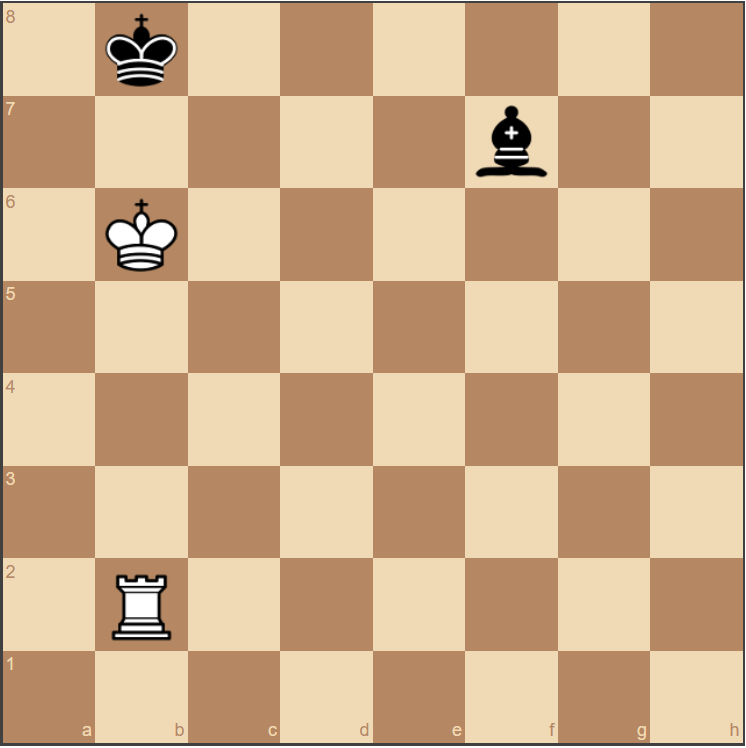
Either King and Bishop or King and Knight vs lone King is a draw
If you only have one light piece and King against King, it’s time to shake hands.
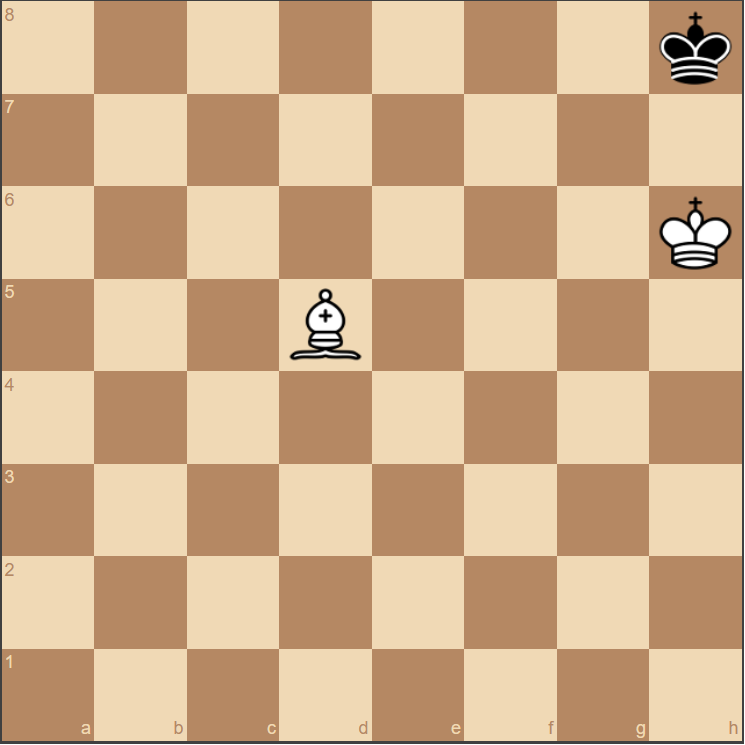
No checkmate here.
If you’re up a light piece (Knight or Bishop) against a lone King, there’s nothing to do but shake hands. No position exists where a checkmate happens with merely a light piece and King vs King.
Understanding the power of the Queen in the endgame
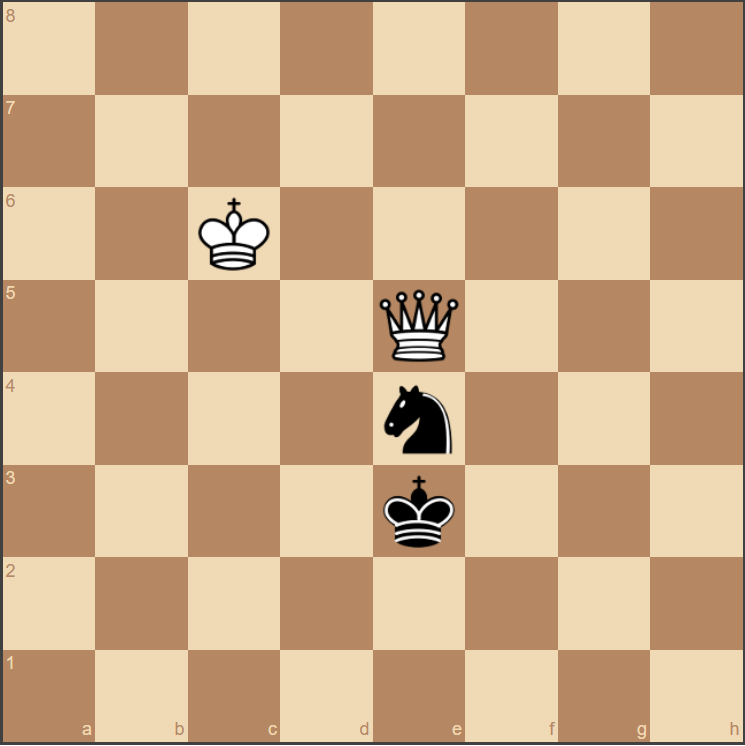
A King and Queen vs King and light piece (either Knight or Bishop) will always be a win for the side with the Queen.

King and Queen vs King and light piece is always a win for the Queen. This will usually consist of a technique where the stronger side brings his King gradually closer, eventually driving the opponent into the corner, where the extra piece won’t be able to prevent a mate.
The same comment as the last one applies to this position. Black cannot stop the gradual advance of white’s pieces, drawing his King towards the corner and checkmate.
Although the weaker side may have some material in this case, it is not enough to put up a good fight. The side with the Queen will inevitably outmaneuver the weaker side and win the defending piece before proceeding to checkmate.
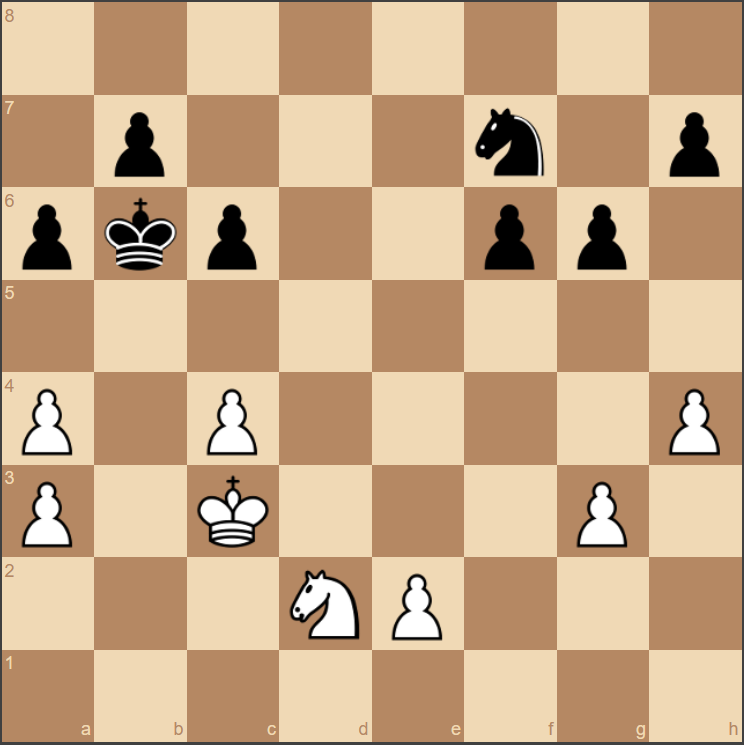
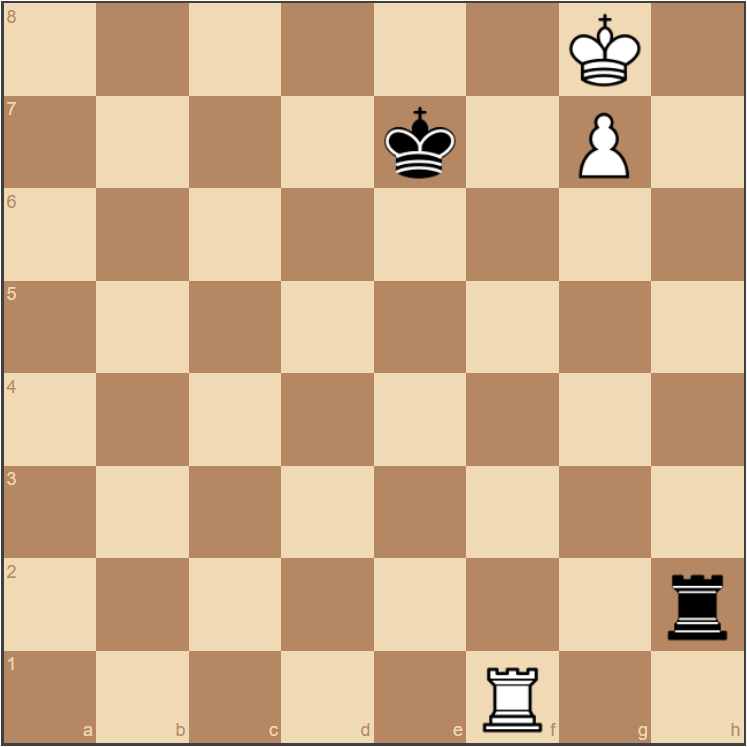
King and Queen vs King and Rook or King and Two Light Pieces can be either a win for the side with the Queen, or a draw.
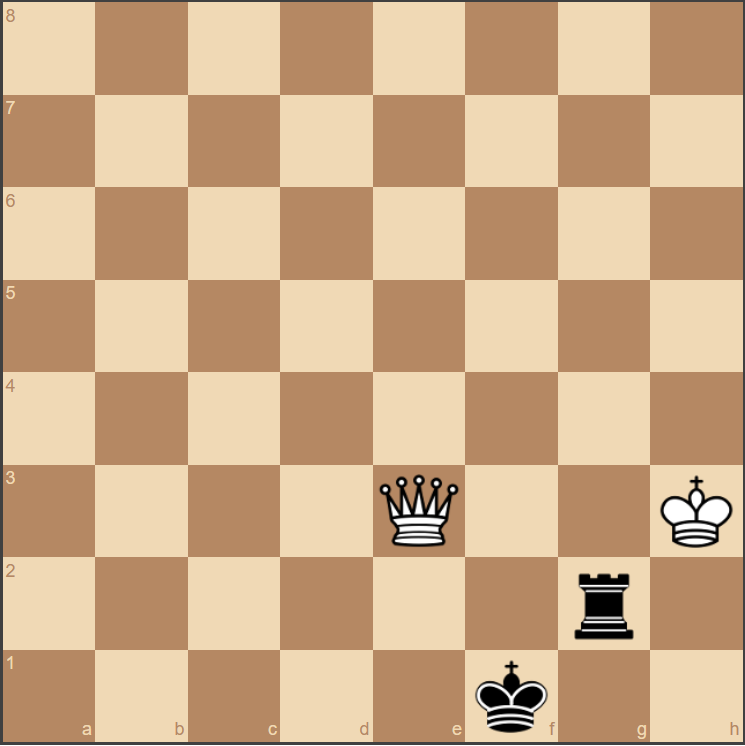
White to play wins, whereas black to play is a draw (1...Rh2+!)
With the Knights close to the King and acting in cooperation, white can hold the black King at bay and manage a draw. With the Knights far away from the King or in a less cooperative position, however, black would be able to clinch the win.
The vital aspect for the defending side is coordination: keeping the pieces together and defended from the opposing Queen while preventing the opponent’s King from approaching. These positions are more complex and should be learned at a more advanced level, but it is good to be aware of the relative values playing out here.
Understanding the King - Basic Principles
The King’s value
The King’s dynamic value increases considerably in the endgame because there are few pieces to attack it, so it can participate in the active struggle.
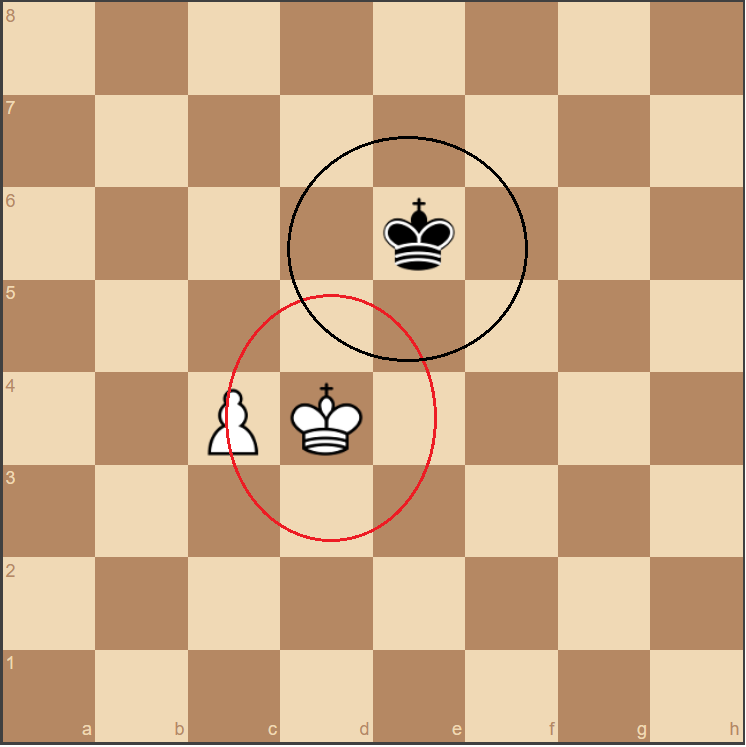
Both Kings are extremely active in the center, each with its full 8-square range of mobility. Black to play is a draw (1...Kd6), whereas white to play wins (1.Kc5).
The King’s mobility
In principle, the King moves better through diagonal routes, making its future moves more unpredictable and maximizing its options. Like other pieces, the King also finds its value greatly expanded once it’s situated in the center, giving it greater freedom of movement and more numerous options.
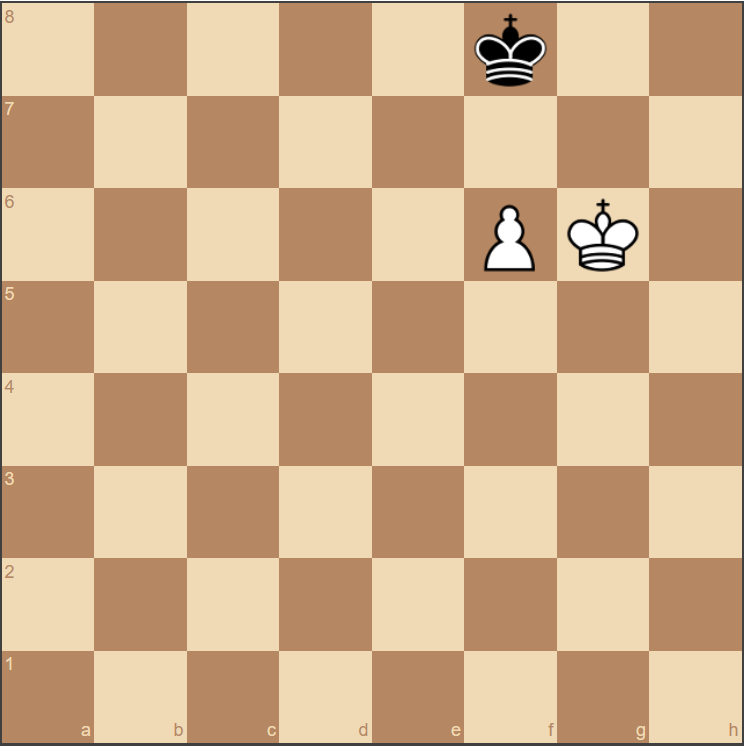
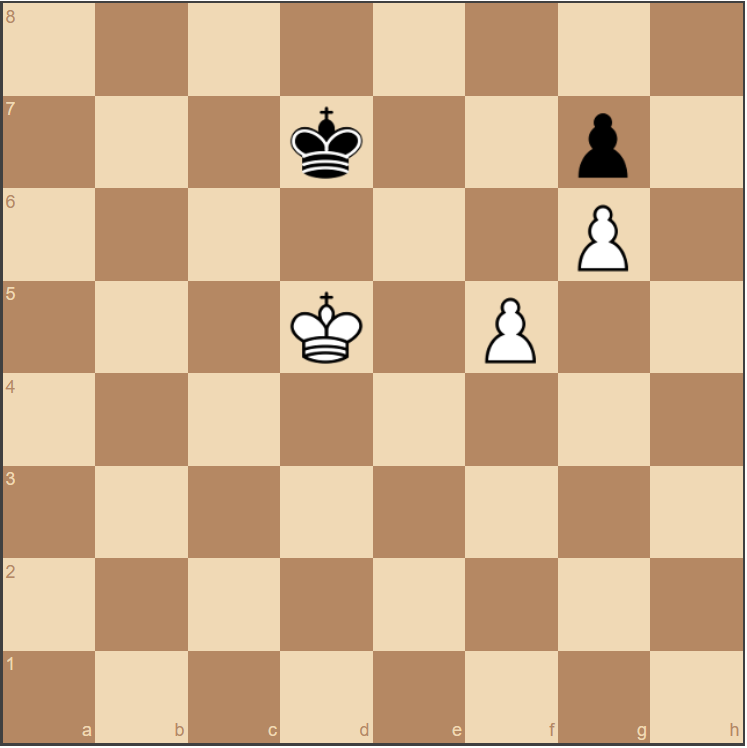
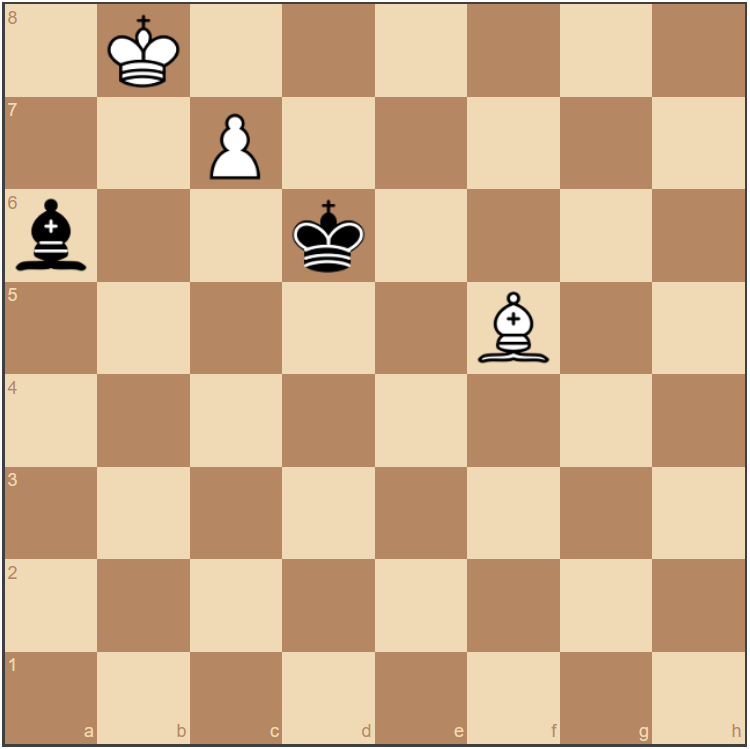
By multitasking -- threatening to both avance towards the black pawn and to protect his own pawn’s promotion -- the white King manages to save the day.
This is the classic Reti’s Position, illustrating that the King moves better through diagonals and towards the center. Here white can draw, even though his King is far from the passed black pawn, by combining threats of supporting the c6 pawn with a gradual advance to the “square” (see below) of the black pawn.
Understanding the Pawn - Basic Notions
The pawn’s value
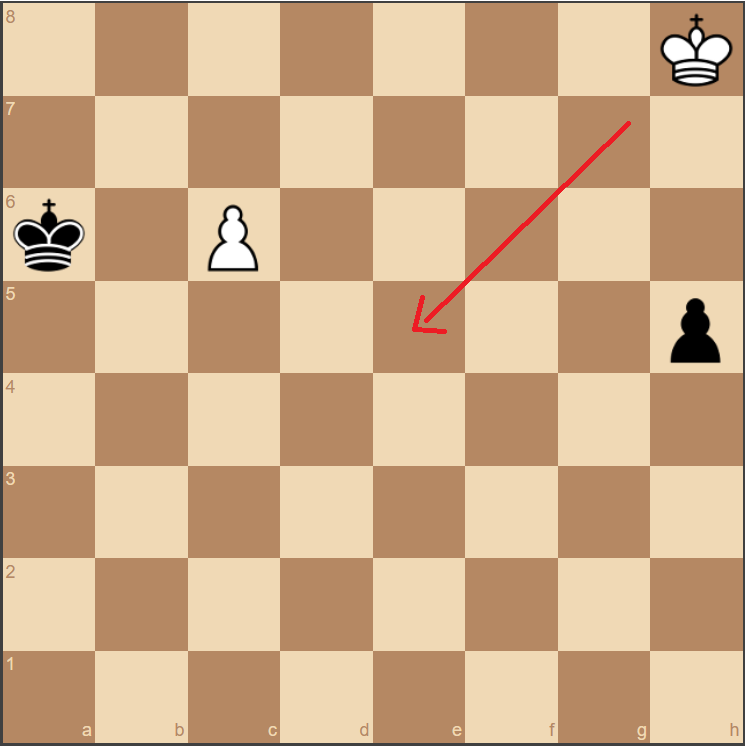
Similar to the King’s, the pawn’s value also changes dramatically in the endgame. This is because, since there are not many pieces about, the possibilities are real for the pawn to reach the eighth rank unimpeded, thus creating another Queen and drastically changing the game.
White is two pawns down, but wins by pushing his passed — and unstoppable — h-pawn.
Basic pawn Endgames (King and pawn vs King)
The Rook pawn
A clear stalemate, which can often be achieved against a Rook pawn.
The weaker side always draws if it places its King on the promotion square (as there is no way to force the King out of the pawn’s way). The outcome is usually stalemate.
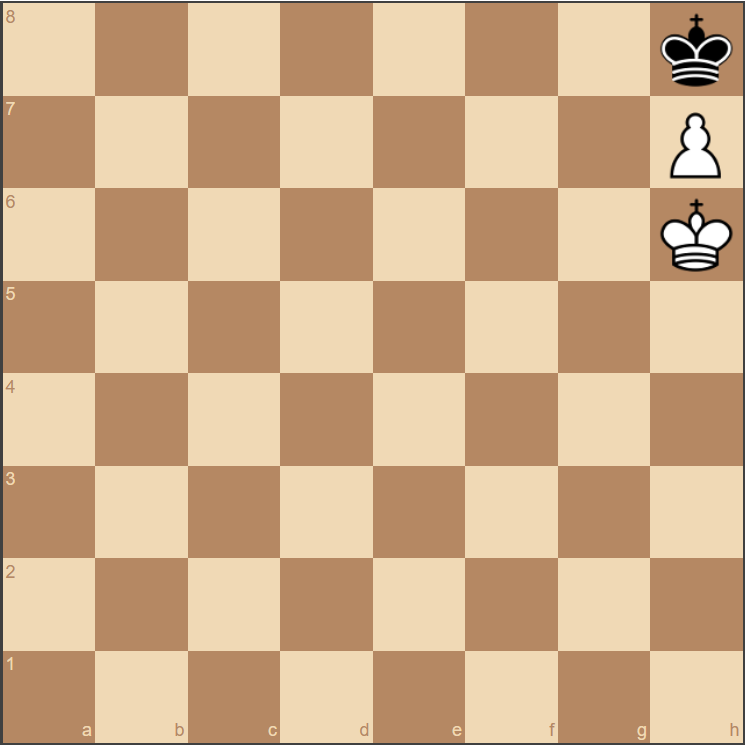
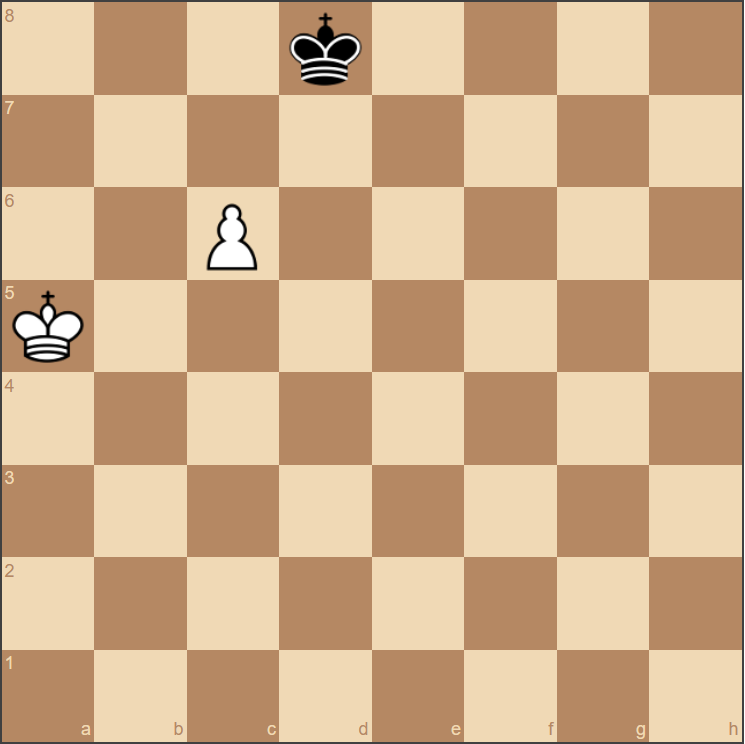
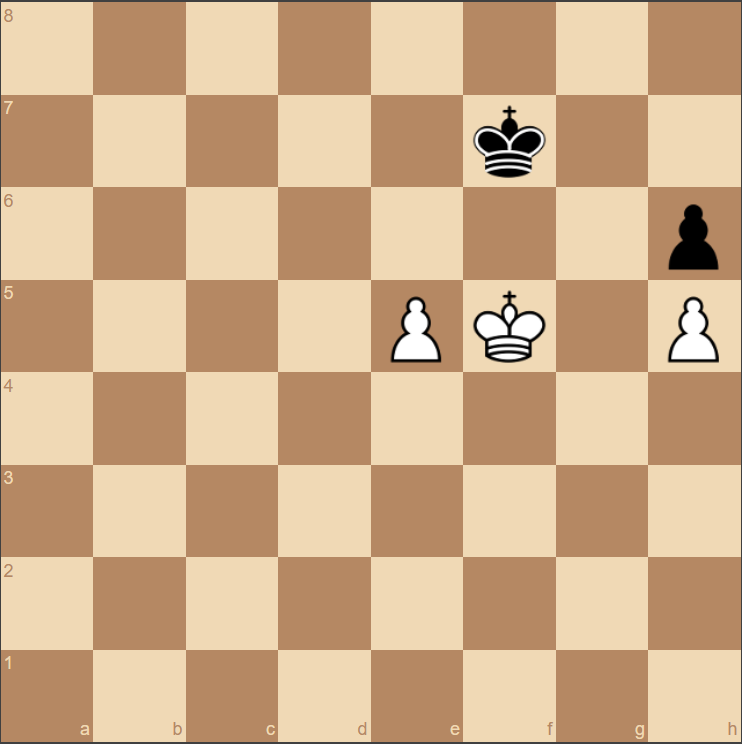
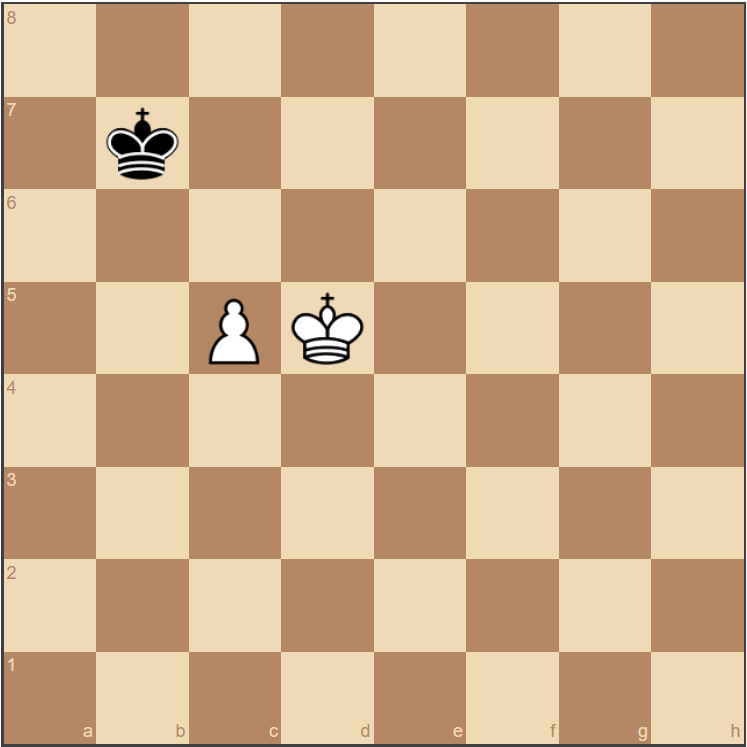
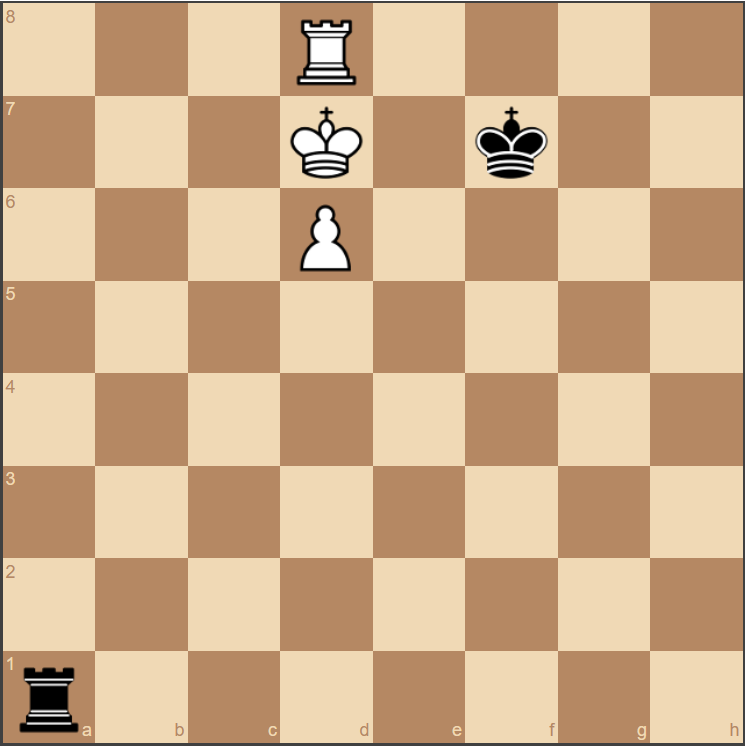
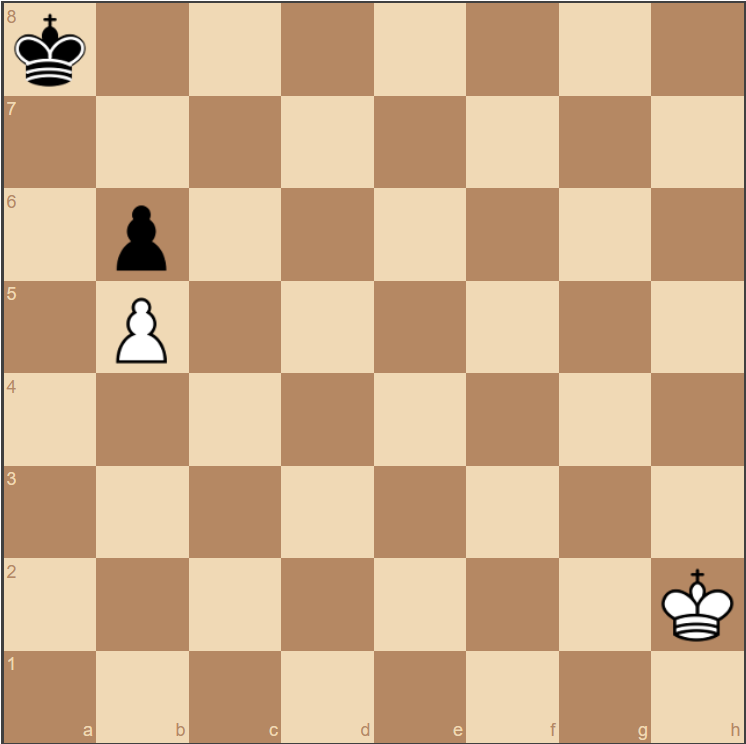
King on the Sixth

King on the sixth, in front of the pawn, always wins.
A central concept: if the side with King and pawn has the King on the sixth rank and in front of his pawn, he can always force a win.
Click here to learn this endgame in an interactive, step-by-step tutorial.
Basic opposition
Who has the opposition? That’s the deciding question on this position. White to play is a draw, black to play is a win for white.
Understanding the principle of opposition, which essentially consists of blocking the opponent’s King with one’s own, and forcing it to choose one side to go and thereby concede space on the other side.
Click here to learn this endgame through an interactive, step-by-step tutorial.
Click here to practice this endgame.
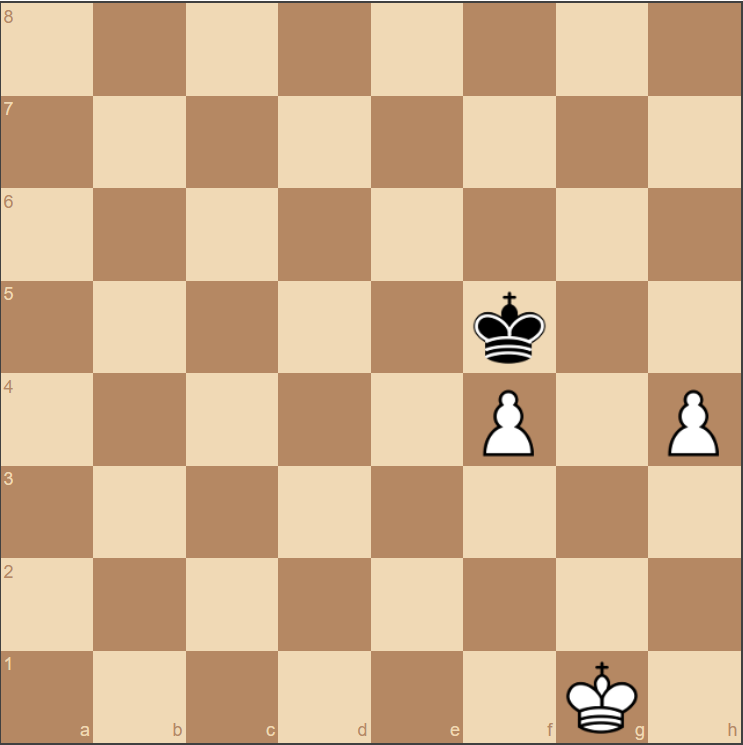
Square of the pawn
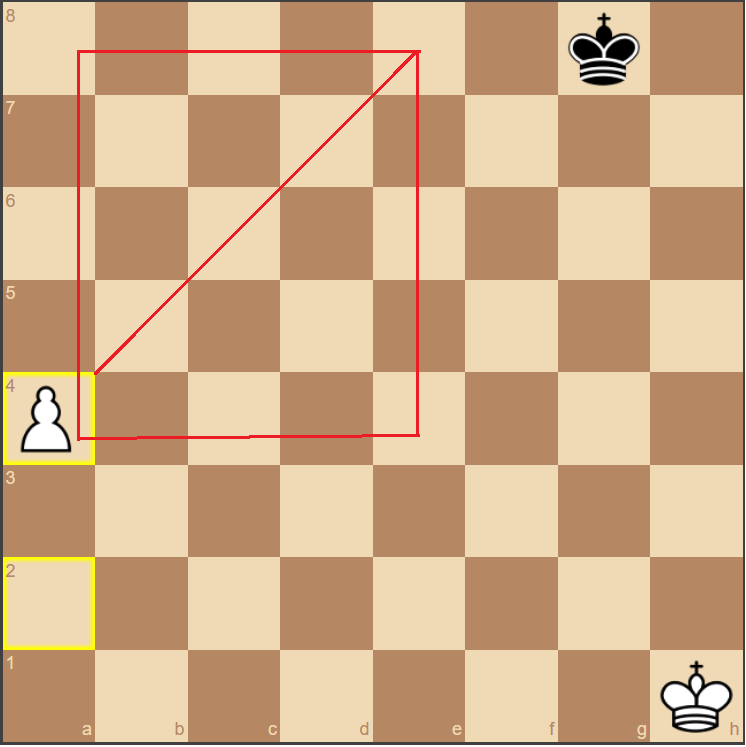
A quick method of calculating whether or not the pawn makes it to the end of the board.
In a race between pawn on one side (towards promotion) and King on the other (trying to stop it), the concept of the square makes for a quick way to calculate which side will attain its goal.
Click here to learn this endgame through an interactive, step-by-step tutorial.
Click here to practice this endgame.
Class D (1200-1399)
King and pawn vs King
Long-distance opposition
Knowing short-distance opposition, you can understand long distance opposition easily. The same outflanking method applies.
This is simply an extension of the classical, one-square-apart opposition, which is the most useful concept in King and pawn endgames. The goal of giving long-distance opposition is usually to take the opponent into a position where he’ll be faced with a short-distance opposition that will allow you to decisively outflank him.
Click here to learn this endgame through an interactive, step-by-step tutorial.
Click here to practice this endgame.
Diagonal opposition
Again an offshoot of the classical opposition, diagonal one usually converts into it.
Similar to the long-distance opposition is the diagonal opposition, which again aims to convert into a classical opposition and consequent outflanking of the opponent. Diagonal oppositions can also be distance, but in this case we’re looking at short-distance ones. The opposition in all its various forms is absolutely essential for an advanced understanding of the endgame, and should be practiced as often as you can, until you have it at an instinctive level.
Click here to learn this endgame through an interactive, step-by-step tutorial.
Click here to practice this endgame.
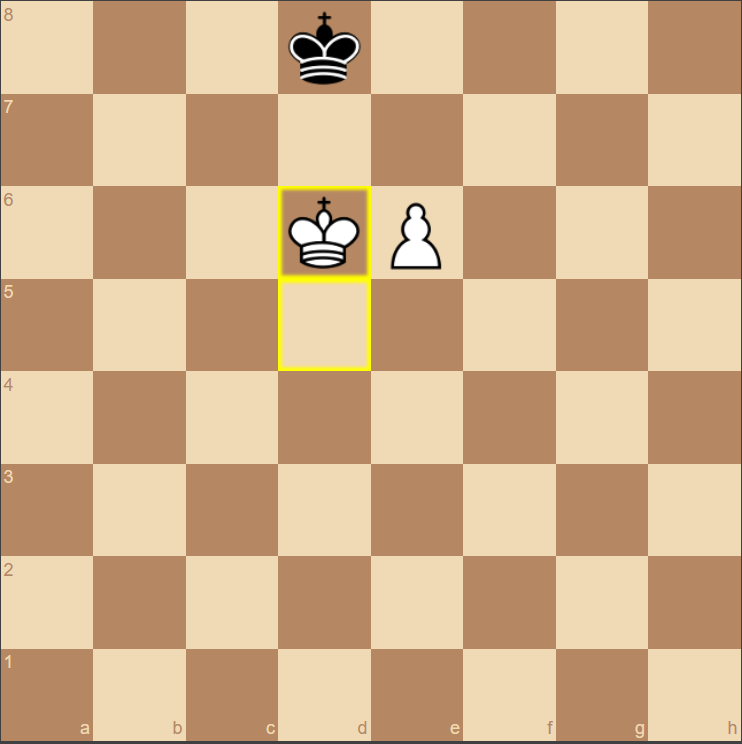
King and pawn vs King: The Convoy
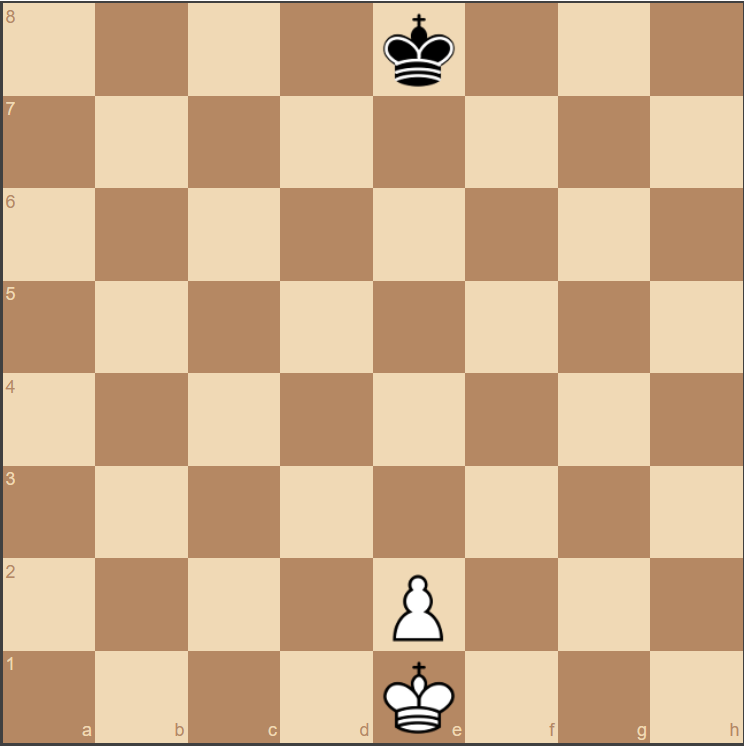
An important position to understand. The King must open the way for the pawn.
This principle determines that in pawn endgames the King should always march in front of the pawn, opening up space for it. This concept applies in a general form to all pawn endgames, and is based on the fact that the pawn is easily blockaded. The “King on the sixth in front of the pawn always wins” principle, which you already know, is an offshoot of this, more general one.
Click here to practice this endgame.
Pawn principles
Doubled pawns
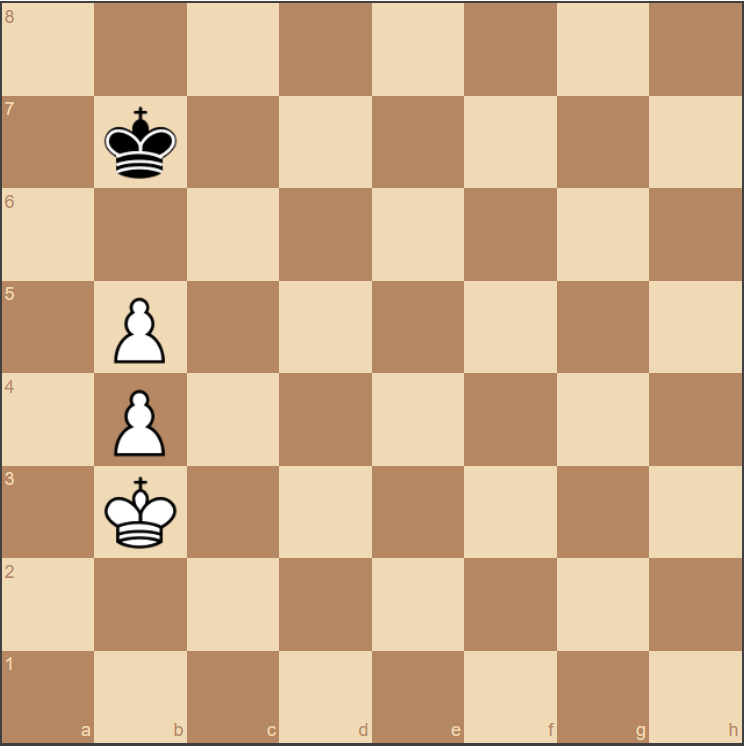
Doubled pawns are unable to protect each other, and as such create a huge liability for the side that holds them. Here white is winning.
Understanding why doubled pawns are weak in the endgame is very important. Basically, they are weak because they do not defend each other and can suffer a devastating frontal attack.
Click here to learn this endgame through an interactive, step-by-step tutorial.
Click here to practice this endgame.
The weakness of a backward pawn
The white pawn on a2 is backward. Although material is equal, black has the upper hand and should win due to the greater mobility of his pawn majority on the kingside.
Backward pawns are those that cannot be supported by another side pawn in their next move, and may be taken by an enemy pawn if they do move. The difficulty to push them forward makes them immobile and an easy target, hence a weakness.
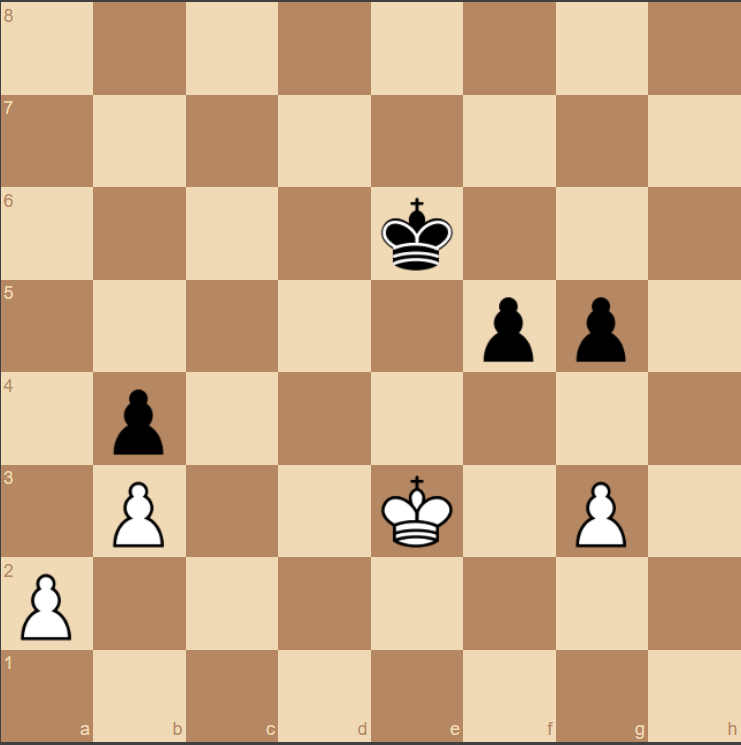
Decoy pawn
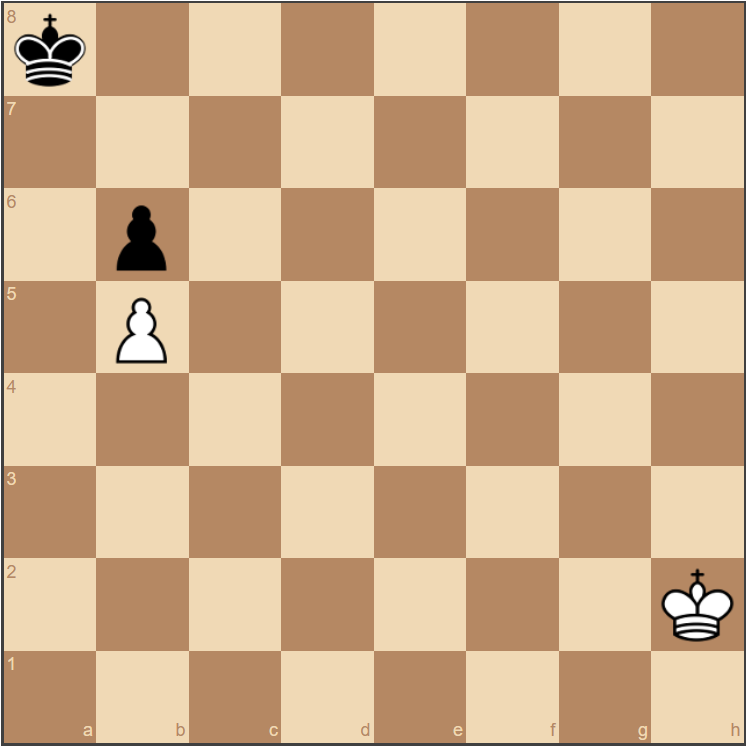
Sacrificing the passed pawn, white can distract the black King away from the action and promote his other pawn.
A common tactical resource is sacrificing a pawn in order to decoy the enemy King away from the protection of a chain of pawns or an important solitary pawn. Having this principle constantly in mind can help you find a path to victory in many positions, complicated or simple.
Click here to learn this endgame through an interactive, step-by-step tutorial.
Click here to practice this endgame.
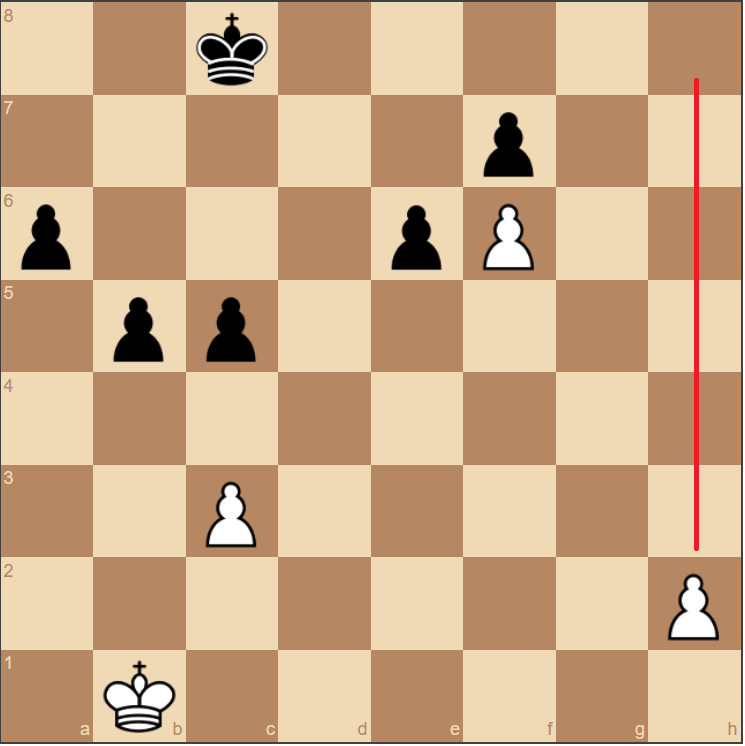
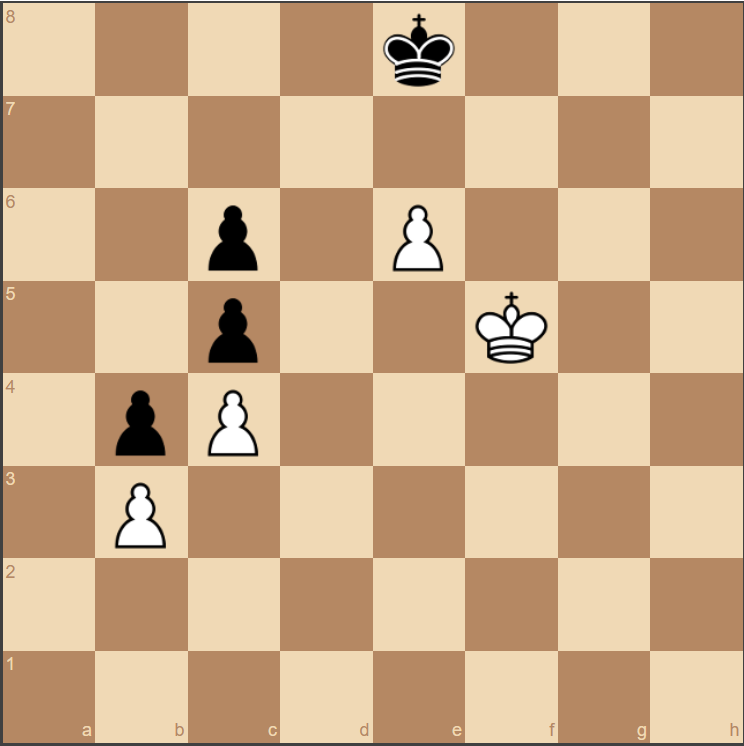
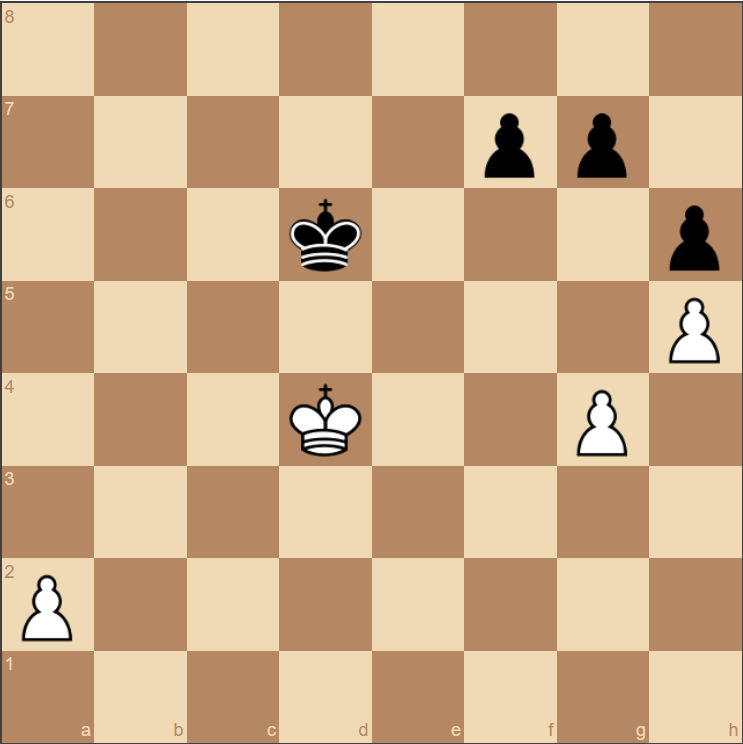
Knowing pawn chains, or islands
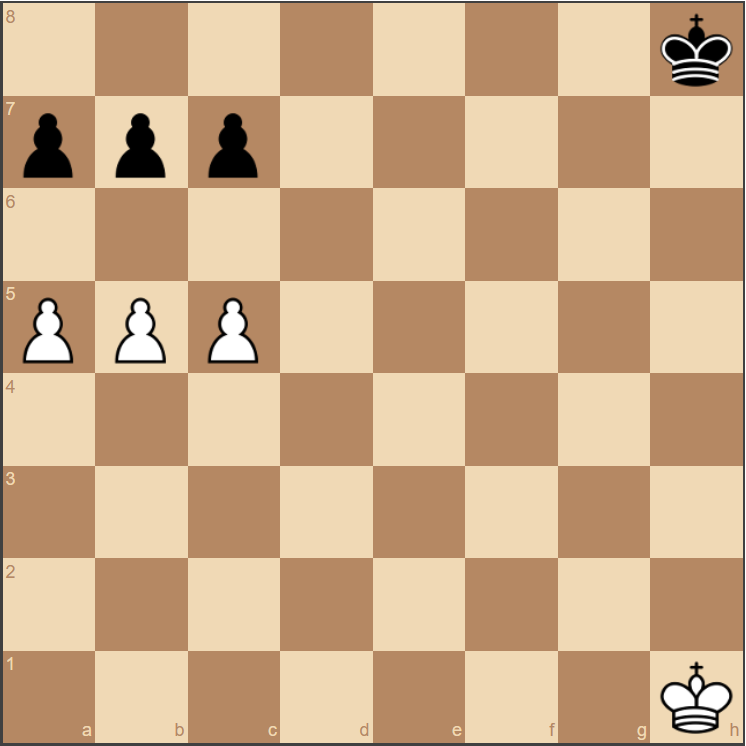
How many pawn chains, or islands, does each side have? White has four, black has two. Even though material is equal, black has a huge advantage because his pawns can be more easily protected.
An important category to have in mind, a pawn chain is any group of pawns that stand on adjacent files to one another, and thus have at least in principle the possibility of defending each other. Good players understand the importance of having as few chains as possible, which considerably lightens task of defending individual pawns
.
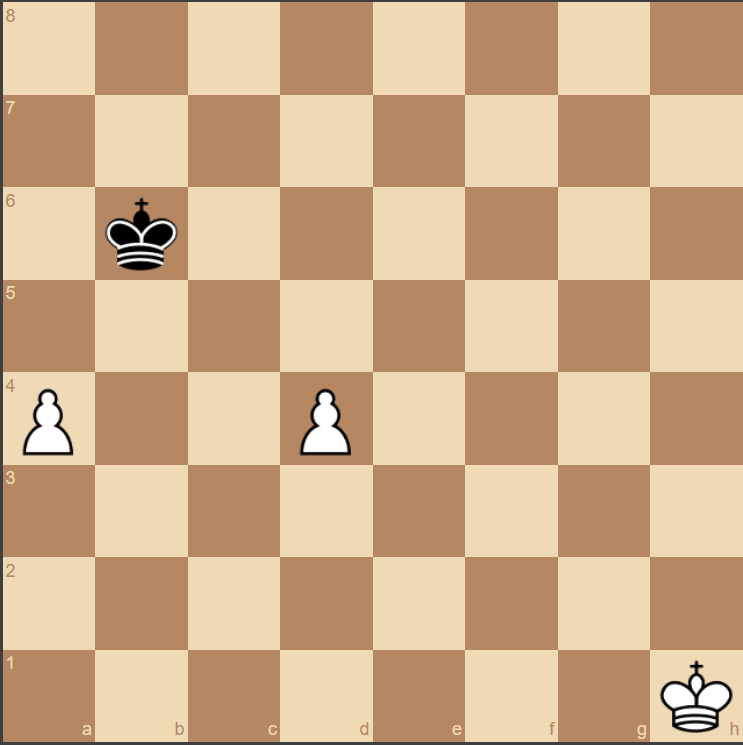
Two passed pawns against an enemy King
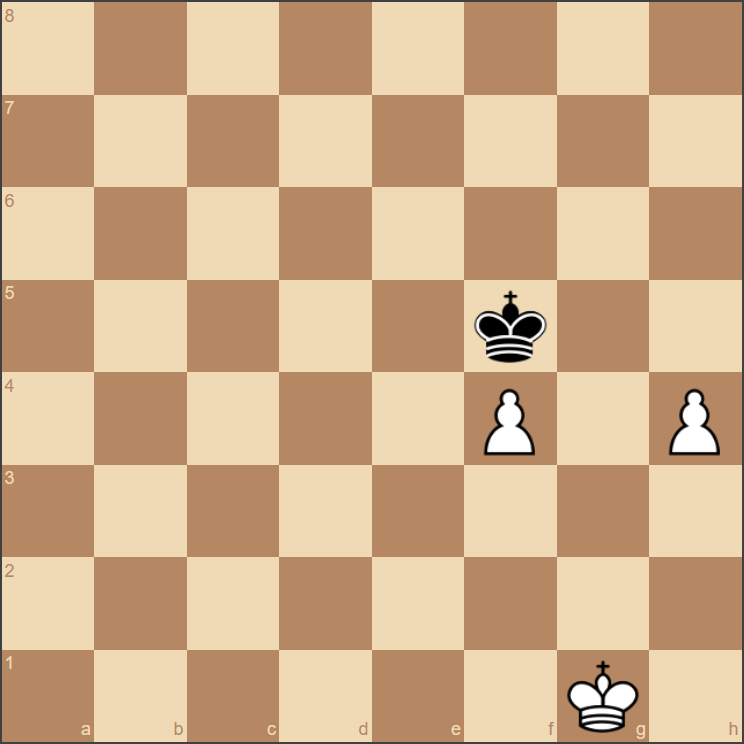
White to move wins, since by pushing one pawn white makes sure that the King cannot take the other one without relinquishing control of the promotion square of the other pawn.
Two passed pawns (that is, pawns that can theoretically advance all the way to the eighth rank without being disturbed by enemy pawns) hold their own easily against a lone King: one pawn defends the other; if the King takes the defender, that puts it outside of the “square” of the forward pawn, which will then successfully advance towards promotion.
Click here to learn this endgame through an interactive, step-by-step tutorial.
Click here to practice this endgame.
Piece vs Pawn
A Bishop vs an individual pawn
Black to play draws easily by holding off the passed pawn with 1...Bc5. Bishops often have an easy time against passed pawns.
Due to their high mobility, Bishops have an easy time controlling solitary pawns. Unless the pawn is on the verge of promotion, Bishops will invariably have the time to stop it.
Knight vs individual pawn
Knights find their nemesis in Rook pawns, since blocking them means having very little mobility; a Knight on the rim is grim, as Tarrasch said.
(Knights may find it harder to deal with passed pawns, especially Rook pawns. While this is something to be aware of, a deeper understanding of it is best left for a further level.)
Click here to learn this endgame through an interactive, step-by-step tutorial.
Click here to practice this endgame.
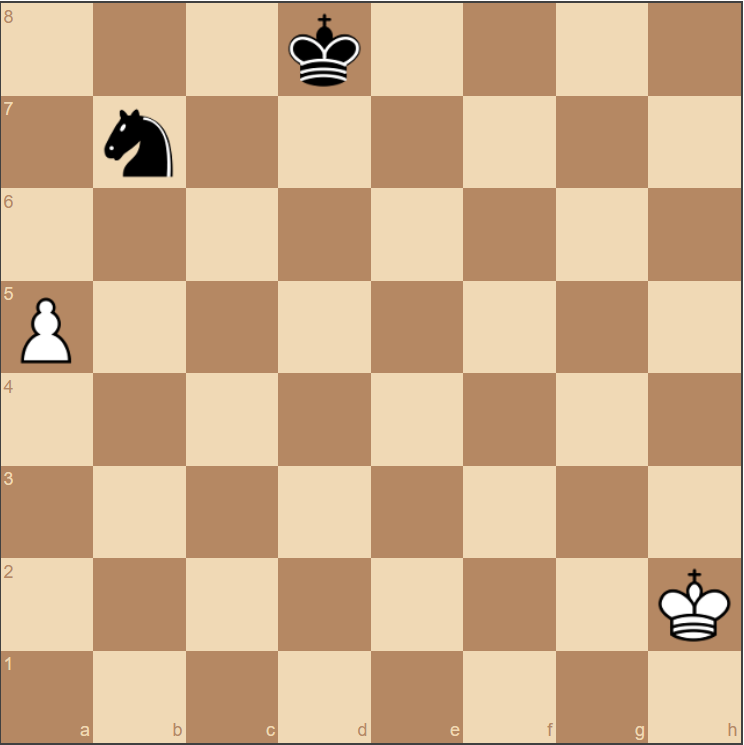
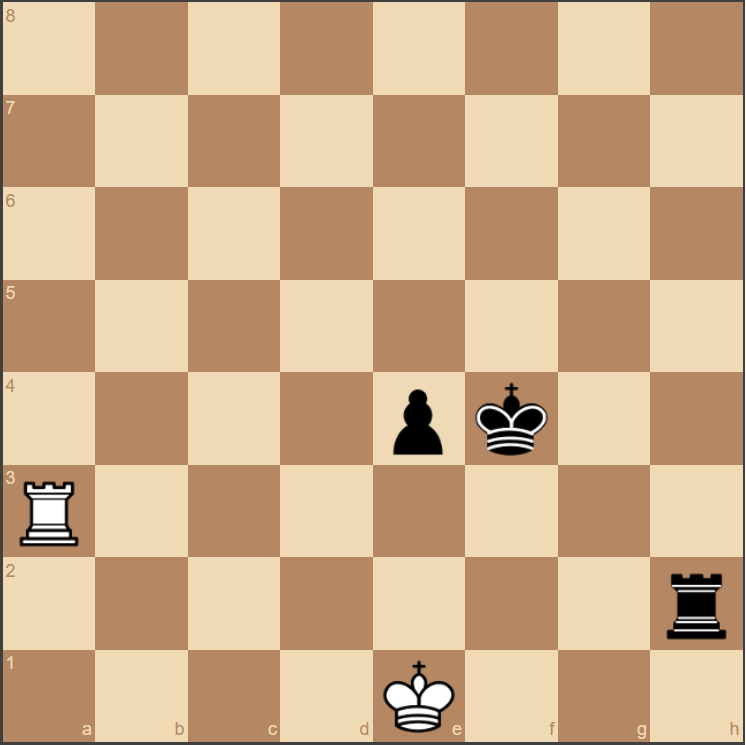
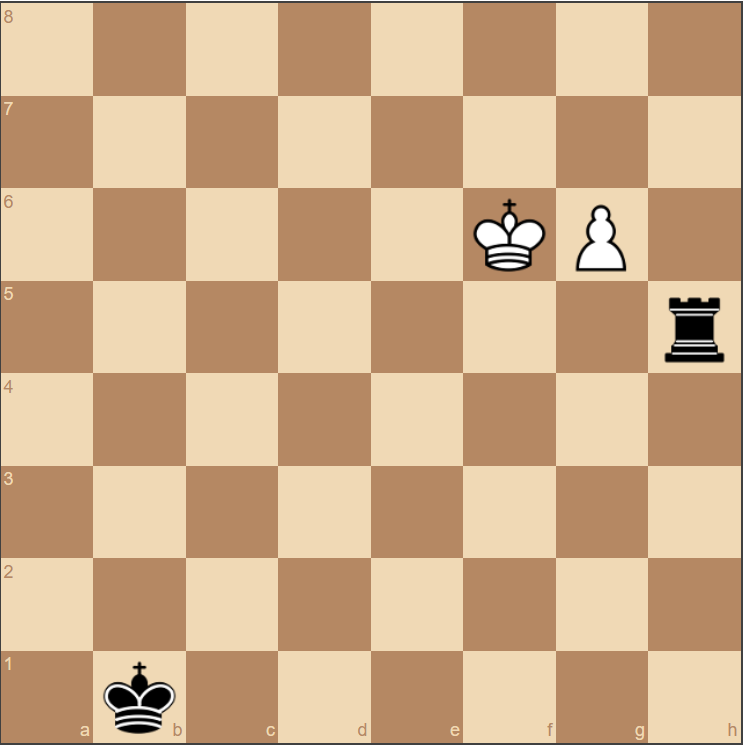
Rook vs pawn
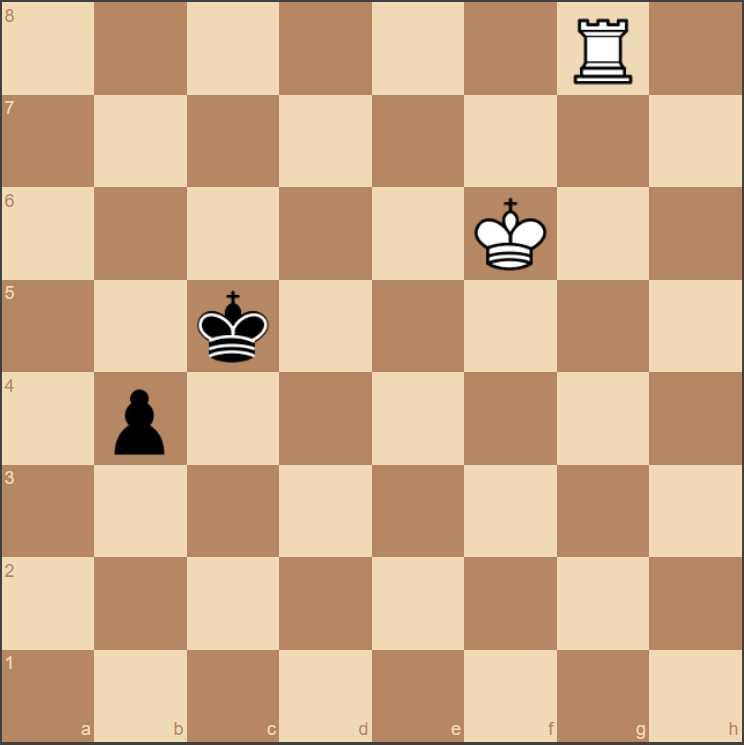
White must try to stop the pawn, take it, and then checkmate with Rook and King. This is not always possible, though, especially if the King of the stronger side is far away from the pawn.
Rooks usually win against pawns, even ones relatively advanced and supported by their King. Although at this level it’s not crucial to go deeper into these dynamics, it’s important to be aware that if the pawn is advanced enough, a draw may be possible.)
Click here to learn this endgame through an interactive, step-by-step tutorial.
Click here to practice this endgame.
Queen and pawn vs Queen
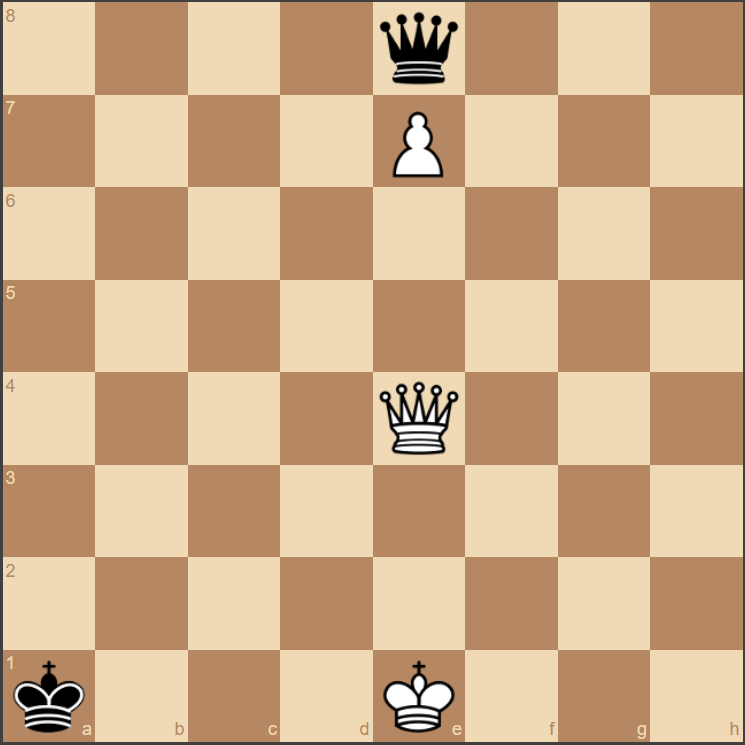
An easy win for the stronger side, since the white pawn is far advanced enough.
This kind of ending can happen with relative frequency and is important to be aware of the fact that if one side has an advanced enough pawn, a series of checks that forces an exchange of Queens will usually lead to a win.
Click here to learn this endgame through an interactive, step-by-step tutorial.
Click here to practice this endgame.
Class C (1400-1599)
Some more King and pawn vs King positions
Mined squares: basic principles
Mined squares are sets of corresponding squares. If a King walks into one of them, the other King walks into the corresponding square and “blows up” the enemy King, meaning that the latter will then be forced to move and relinquish control of key squares.
One of the key endgame principles, understanding mined squares ensures that you can make the best use of the opposition principle in slightly more complex situations.
Click here to learn this endgame through an interactive, step-by-step tutorial.
Click here to practice this endgame.
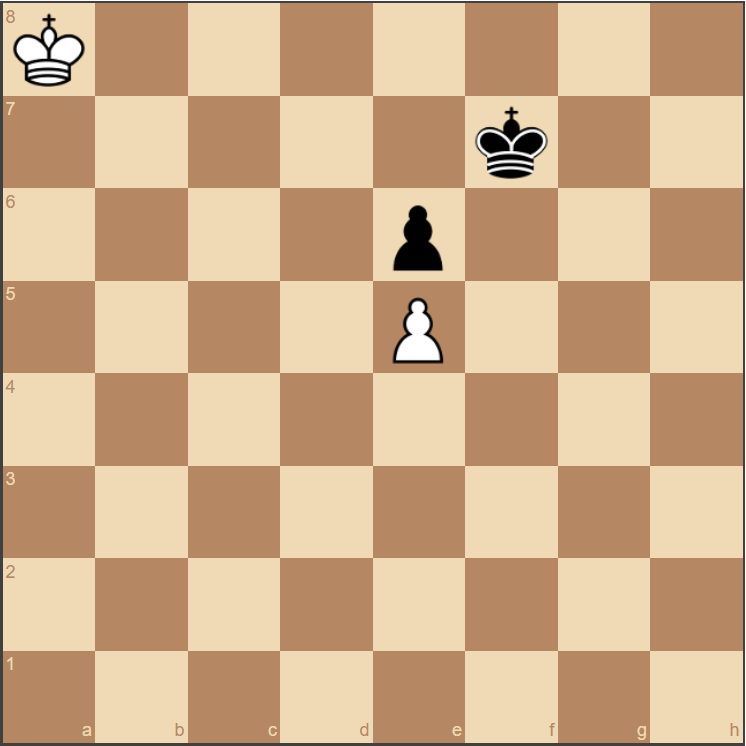
Blocked pawn on the sixth rank
Black to play has an easy draw by giving the opposition. This is the essence of blocking passed pawns in endgames.
Knowing how to draw when your opponent’s pawn is on the sixth rank and your King blocks it, as well as when the tempo is “wrong” and the stronger side will win, is also key, especially for situations where you are short on time. In the situation above, black to move draws, but white to move wins.
Click here to learn this endgame through an interactive, step-by-step tutorial.
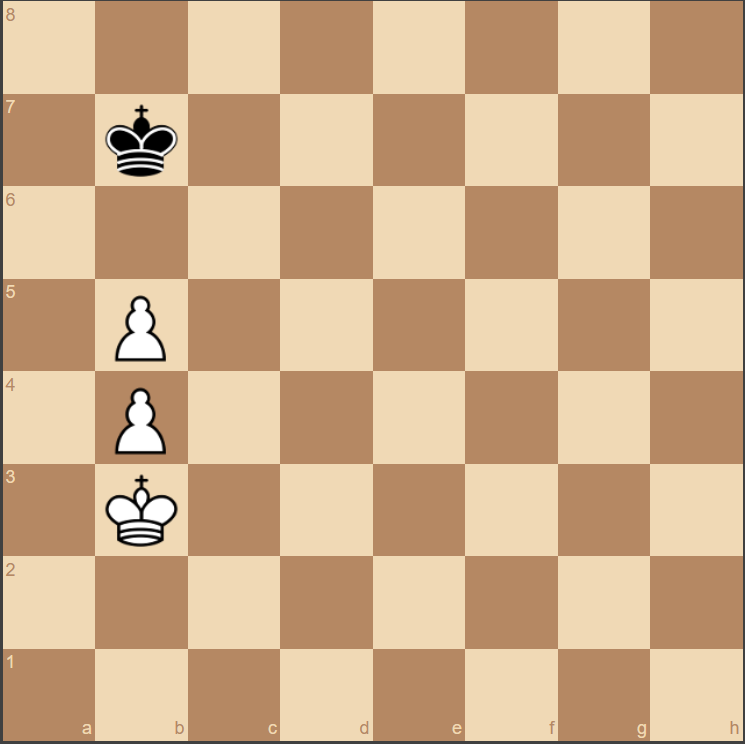
King and Two doubled pawns vs King
Doubled pawns are a liability, but when your opponent has none, they can be a good thing. Here white is better off with the extra pawn, which he can use to sacrifice in order to promote his other pawn.
Such endgames are usually a win, since even if the pawns are blocked the stronger side can sacrifice one to reach a pawn-on-the-sixth winning position, as seen in the previous example.
Click here to learn this endgame through an interactive, step-by-step tutorial.
Click here to practice this endgame.
Stalemating a King in front of a Rook pawn
Either side to play is a draw, since the black side will have no legal moves available.
Another resource for the side defending against a passed Rook pawn: if your King can’t get in front of the pawn to stop it, you can often make sure that the opponent’s King does all the blocking job.
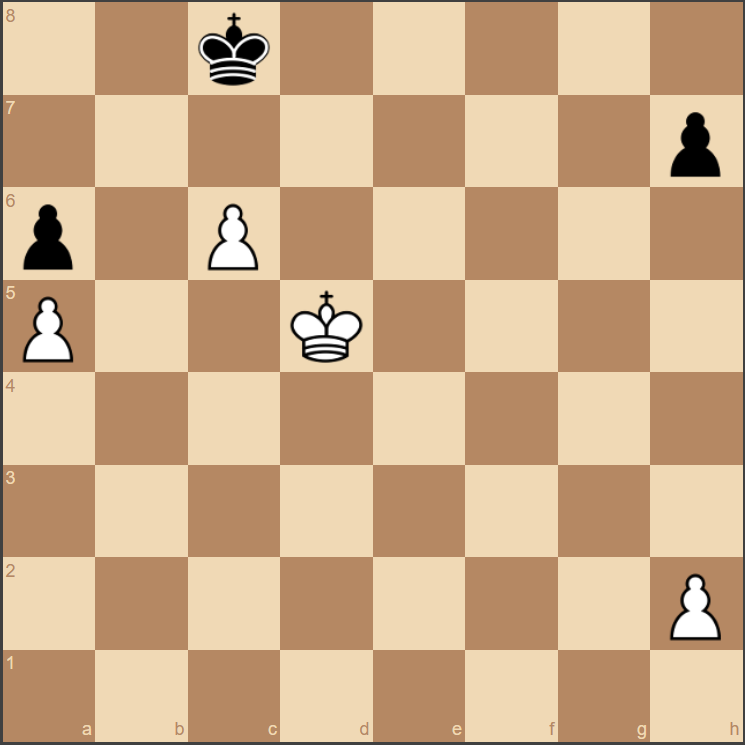
Outside passed pawn
The same decoy principle applies here: one side must repair his King away from the main nucleus of pawns, leaving them vulnerable to the opposing King.
When one side has a passed pawn on the wing opposite to that where the main pawn formation is, this pawn can be used as a decoy, drawing the opponent’s King away from the defense of his pawns and rendering them vulnerable.
Some more King and pawn vs King and piece positions
King and pawn vs King and Knight
Another position where the Knight finds it hard to fight against a pawn on the edge of the board.
The Knight can be particularly bad against passed pawns, and it’s important to be able to recognize such positions. Here white merely advances the pawn and black has no good options.
Click here to learn this endgame through an interactive, step-by-step tutorial.
Click here to practice this endgame.
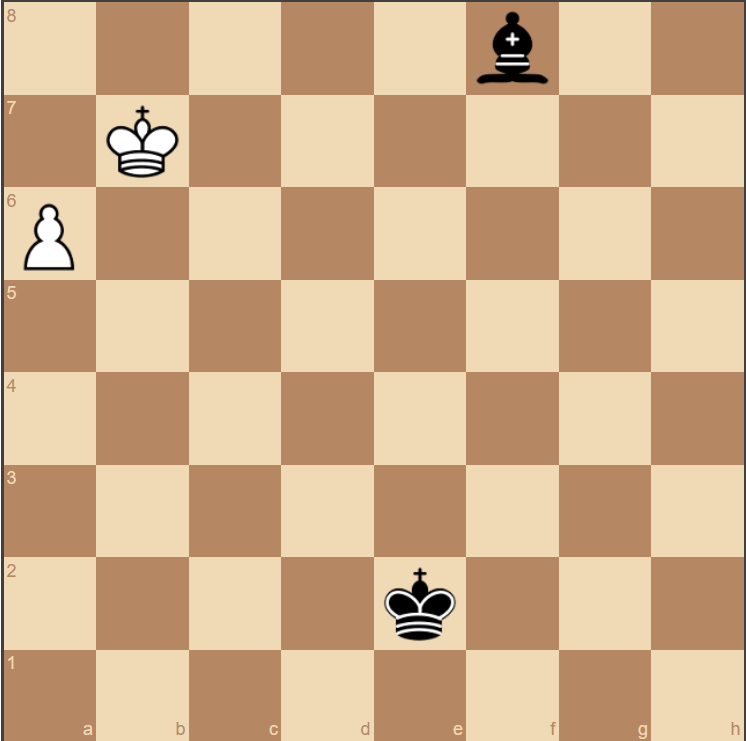
King, Rook pawn and Bishop vs King
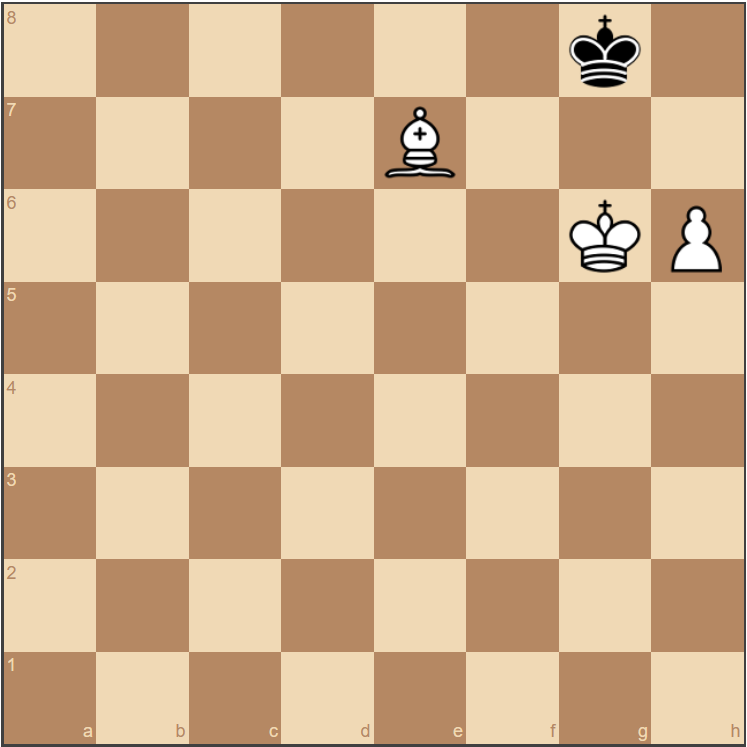
If the Bishop controls the promotion square, you’ll always have a win -- even with a Rook pawn.
If the Bishop is of the same color as the promotion square, the win is possible. If the contrary is true, the weaker side draws provided it manages to reach the promotion square.
Click here to learn this endgame through an interactive, step-by-step tutorial.
Click here to practice this endgame.
King, Rook pawn and Knight
Gradually approaching with the King, white will be able to defend the pawn and then use the Knight to push the pawn forward.
This always win for the side with the Knight, even if it may seem tricky at first.
Click here to learn this endgame through an interactive, step-by-step tutorial.
Click here to practice this endgame.
Bishops of opposite colors
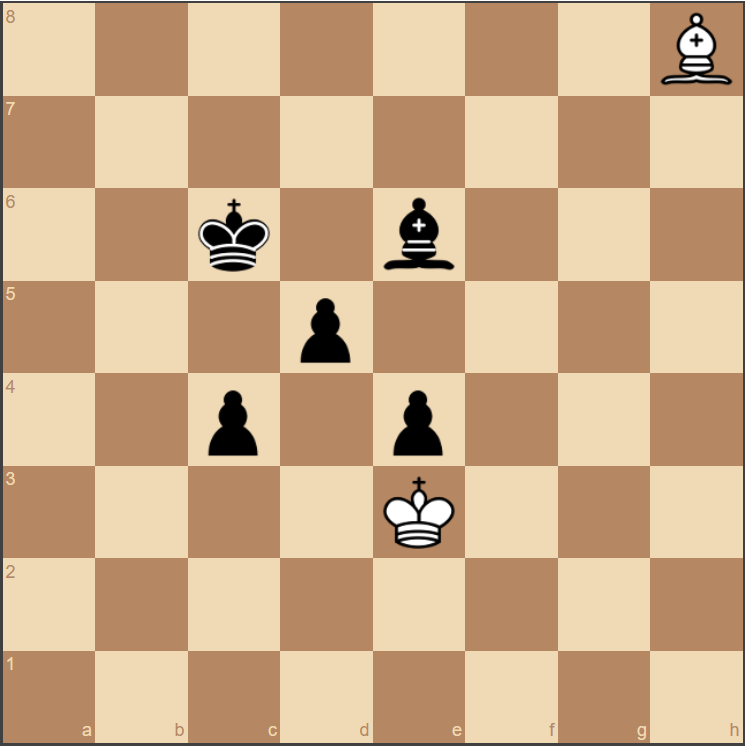
A huge drawing factor: what one Bishop attacks, the other cannot defend.
Bishops of opposite colors are a well-known drawing factor. Here, for instance, black cannot force a win in spite of being three pawns up: if the pawns are on the same squares as his Bishop, there is no way to force them through the barrier of King and Bishop that the weaker side presents.
Class B (1600-1799)
King vs King and pawn endgames (advanced)
Two passed pawns separated by one file hold their own against a frontal attack by the enemy King
Black to play would draw with 1...Kg4, but white to play wins thanks to the threat of pushing one pawn too far.
A useful concept, when the King attacks one pawn, the other advances, threatening to push forward in case the King captures the other one.
Two passed pawns separated by two files may still be stopped by the opposing King
Due to the white King’s remote position, black can hold the draw.
The trick here is a back-and-forth by the King. Crucially, the stronger side’s King must be far away enough to warrant this maneuver, which in the diagram begins with 1...Kc5! (there follows 2.d5 Kb6 3.Kg2 Kc5 and the draw is clear)
Two passed pawns separated by three or more files always win
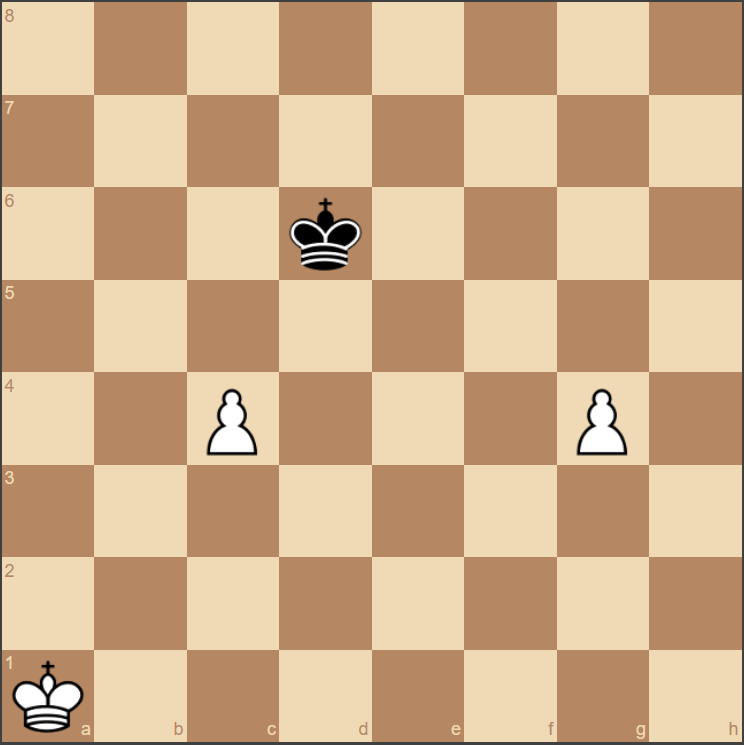
Even if black’s King were on c5 and ready to take on c4, it would still be a draw. The King cannot control both pawns’ squares at the same time.
No matter in which rank they stand, these pawns will be safe, since in order to capture one the King must always put itself outside the square of the other.
A Rook pawn on the seventh protected by a Knight pawn on the sixth vs opposing King on the promotion square
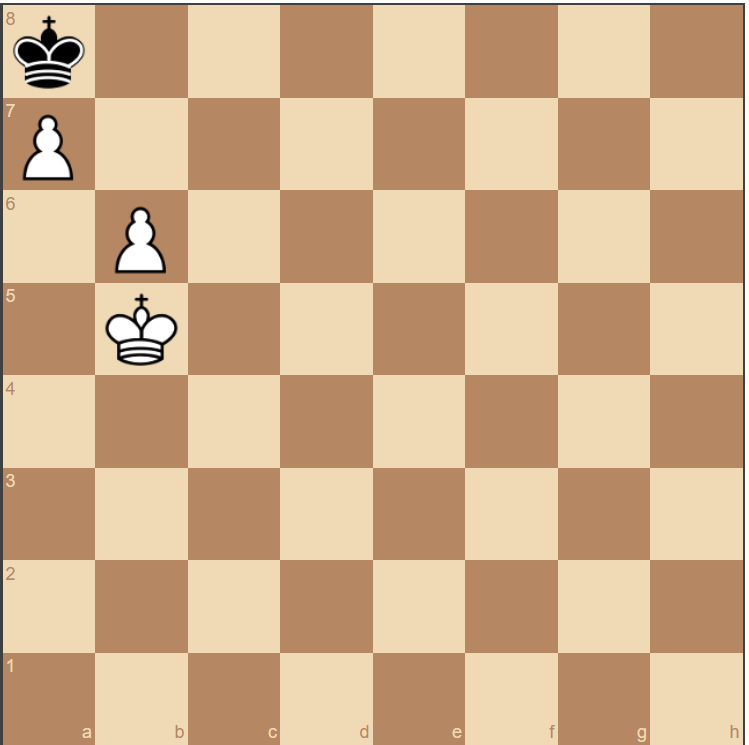
White wins, but first must make sure that no stalemate occurs.
This tricky position relies on an understanding of the pawn-on-the-sixth-rank situations. White wins by sacrificing the Rook pawn. In the diagram we thus have: 1.Ka5! Kb7 2.a8=Q Kxa8 3.Ka6 Kb8 4.b7 Kc7 5.Ka7
Pawn breaks
Two pawns on adjacent files vs a single pawn
There are many ways to win here; one is by means of a breakthrough.
The stronger side can force a breakthrough provided the more advanced pawn is in the fifth rank or farther.
Click here to learn this endgame through an interactive, step-by-step tutorial.
Click here to practice this endgame.
The 3 x 3 breakthrough
Breakthroughs are an elegant and clever way to push a pawn towards promotion.
This is a classic illustration of an important concept in pawn vs pawn endings: the sacrificial pawn break. White to play wins with 1.b6!, a move designed to disrupt the black pawn formation and force a white pawn through towards promotion.
Click here to learn this endgame through an interactive, step-by-step tutorial.
Click here to practice this endgame.
Outflanking
Corollary to the principle of opposition is outflanking, which gradually reduces the distance between the Kings until a simple, short-distance opposition can occur.
Click here to learn this endgame through an interactive, step-by-step tutorial.
Click here to practice this endgame.
Rook and pawn endgames
Rook and two pawns vs Rook
White can gradually push his pawns forward due to the disconnect between black’s pieces.
As long as the pawns aren’t doubled, or both of them are Rook pawns, this will always be a win. The one principle to have in mind is that the pawns should advance gradually, closely supported by the King as well as supporting each other. The Rook usually acts from a distance, giving checks on the opposing King when necessary to keep it from blocking the pawns’ advance. As often in such endgames, a close teamwork is key.
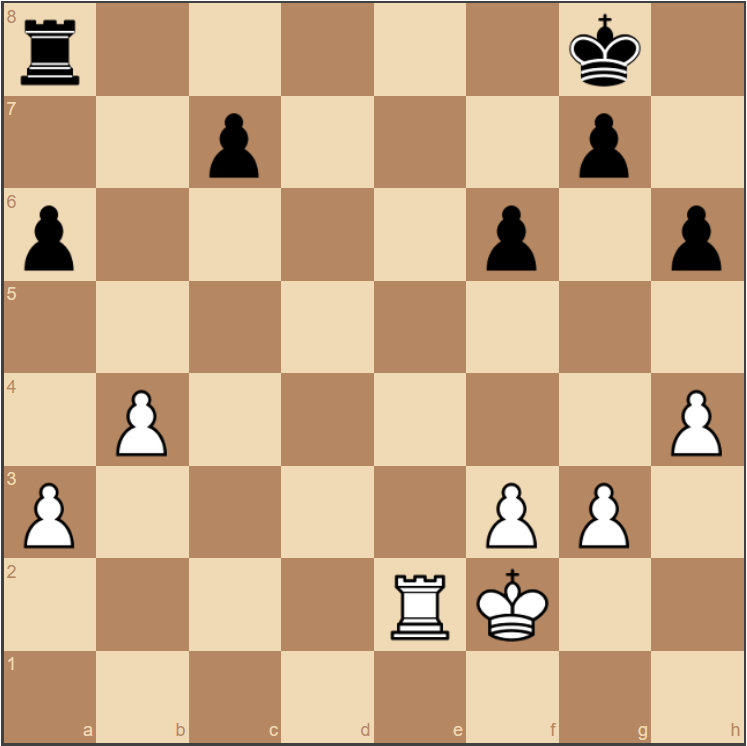
Understanding the importance of the 7th rank
Holding the seventh means putting the other in a passive situation. Black’s best shot here would be to give up the defense of his a-pawn by making his own bid for the seventh with 1...Re8!
The seventh rank is the base of most enemy pawn chains, hence controlling it usually means that your Rook (or Rooks) will be active while your opponent’s will be passive, having to stick to the defense of their pawns.
Understanding the importance of activity
The white Rook is more active: after 1.Rc2, black’s Rook is confined to passive defense and white has the better game.
In Rook endgames, activity is key. Rooks always attack pawns from behind (so that the further the pawn moves, the greater the scope and space available for the Rook). Rooks also defend pawns from behind, for the same reason. A passive Rook, that only acts in defense, is a big and very often a decisive liability.
Checkmating with King and two Bishops vs King
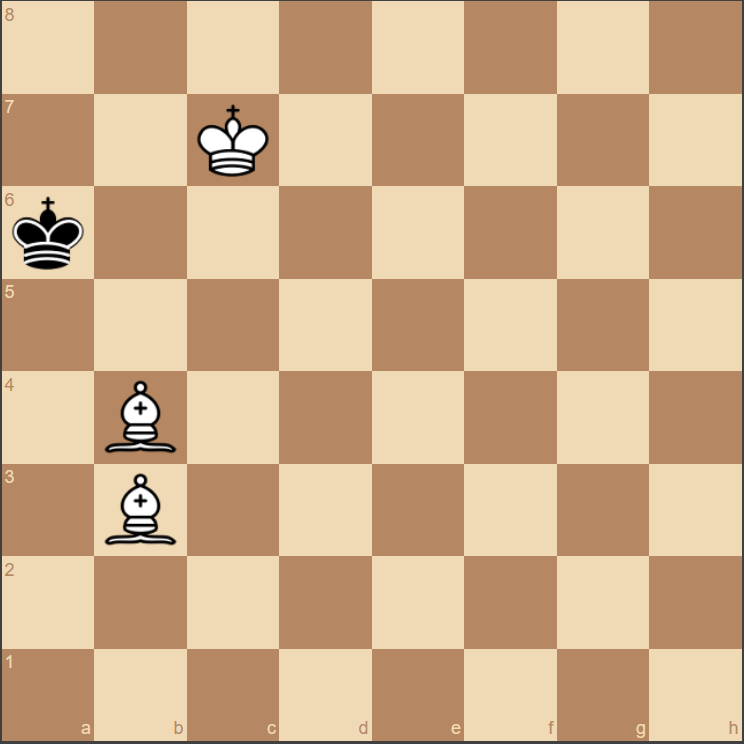
The Bishop roll that we already looked at briefly. Now you should be able to understand how to get here and how to proceed from here.
This is a more common endgame than the King, Bishop and Knight vs King. Although still somewhat rare, it’s worth knowing and reasonably easy to learn.
Click here to learn this endgame through an interactive, step-by-step tutorial.
Click here to practice this endgame.
Bishop and pawn endgames
Opposite-colored Bishops
Sacrificing in order to create a pawn avalanche can help tip the balance when the opposite-colored Bishops push the game towards a draw.
We know that these are a big drawing factor, even in positions where one side is two or even three pawns up. However, sometimes one side has winning chances by a timely sacrifice of his Bishop, turning the endgame into a pawns vs Bishop one.
Same-colored Bishops
Through a series of decoy maneuvers, white manages to draw the black Bishop away from the defense of the promotion square in most such positions.
When one side has one or two passed pawns, the defending side wants to act with his Bishop through the back, behind the advancing pawns. This is the same principle as in Rook endgames.
Click here to learn this endgame through an interactive, step-by-step tutorial.
Click here to practice this endgame.
Queen endgames
Basic principles
In Queen endgames, pawn advantage often counts for very little. Three principles rule, and usually determine the victory: (1) having a passed pawn, (2) having an active Queen, and (3) having a protected King. Hence, if the opponent goes pawn-hunting and wins several pawns, but you have one single passed pawn that is advanced, you may well have an easy win even with little material.
Class A (1800-1999)
Pawn endgames
Reti’s maneuver
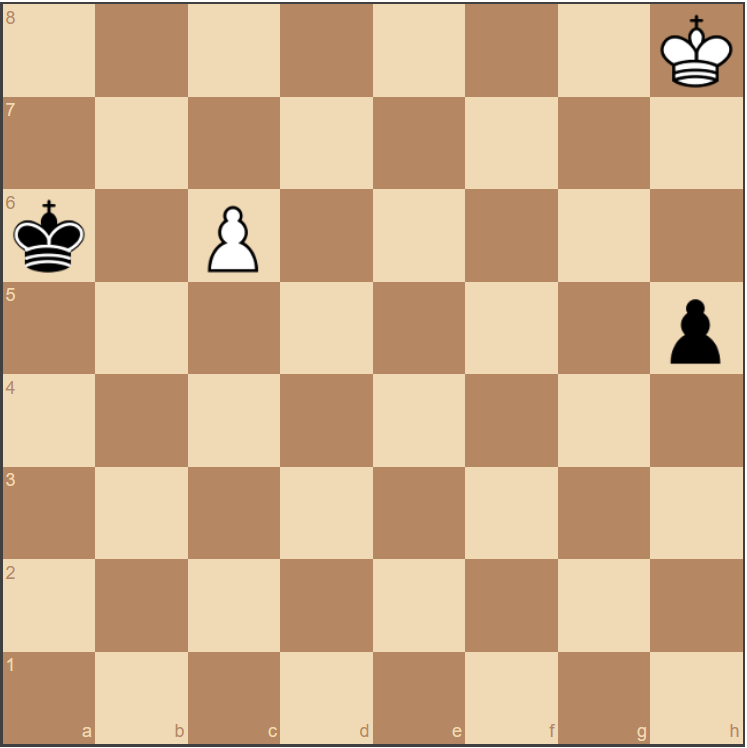
How does the white King stop the pawn on h5, being outside of its square? The answer lies in a combination of threats: the white King goes to the center, where it threatens both to enter the black pawn’s square and to support his own pawn.
This involves a very deep understanding of the principle that Kings in endgames should move in diagonal, rather than straight lines, as well as understanding the use of the center.
Triangulation
Triangulation obtains in many different endgames: simple pawn ones, Rook ones, Queen ones. Here white must give black the move.
This is a maneuver to “pass”, giving the move to your opponent (and putting in Zugzwang, as it is called -- a situation where to move means to lose).
Click here to learn this endgame through an interactive, step-by-step tutorial.
Click here to practice this endgame.
Key squares
Every pawn has a few key squares, that if controlled by the opposite King will guarantee the game is a draw, but if controlled by his own King will ensure victory.
These are squares that, if occupied by one side, determine the outcome of the game.
Click here to learn this endgame through an interactive, step-by-step tutorial.
Click here to practice this endgame.
Rook and pawn endgames
The Lucena
In order to remove the King from blocking the passed pawn, and put it away from black’s checks so as to have time for promoting, white needs to create an “umbrella” with his Rook.
This is one of the classic maneuvers for winning with King, Rook and pawn vs King and Rook.
Philidor’s position
Forcing the pawn onto the sixth, white can then afford to put his Rook behind and give endless checks to the black King.
This, on the other hand, is a position for drawing with King and Rook against King, Rook and pawn. Also essential for Rook and pawn endings.
Short side - Long side
The difference between losing and winning: is the defending King on the short side of the pawn?
When defending against a pawn on the seventh, the weaker side should have the King on the shorter side of the pawn (the side with less squares), the Rook on the longer side.
Click here to learn this endgame through an interactive, step-by-step tutorial.
Click here to practice this endgame.
Passive defense
Passive defense means defending with the Rook along the first rank. It only works against Rook and Knight pawns.
The side defending with King and Rook against King, Rook and pawn, can manage an effective passive defense (with King and Rook on the eighth rank) only against Rook and Knight pawns, provided the King blocks the pawn.
Winning against passive defense
Here’s why passive defense doesn’t work against central or Bishop pawns.
Passive defense fails against central pawns or Bishop pawns, in which case it’s important to know that the winning maneuver consists of switching the Rook to the opposite side of the opponent’s Rook, eventually winning with a skewer check that forces the King to move and allows the Rook to be taken.
Click here to learn this endgame through an interactive, step-by-step tutorial.
Click here to practice this endgame.
Other Rook Endings
A complex endgame that requires a lot of study, but whose understanding pays off.
King, Rook and pawn when the pawn is a Rook’s one and the King is in the promotion square. This is a victory in most cases. If the Rook is in the promotion square, on the other hand, a draw is possible for the weaker side. This is in accordance to the principle of Rook passiveness.
Click here to learn this endgame through an interactive, step-by-step tutorial.
Click here to practice this endgame.
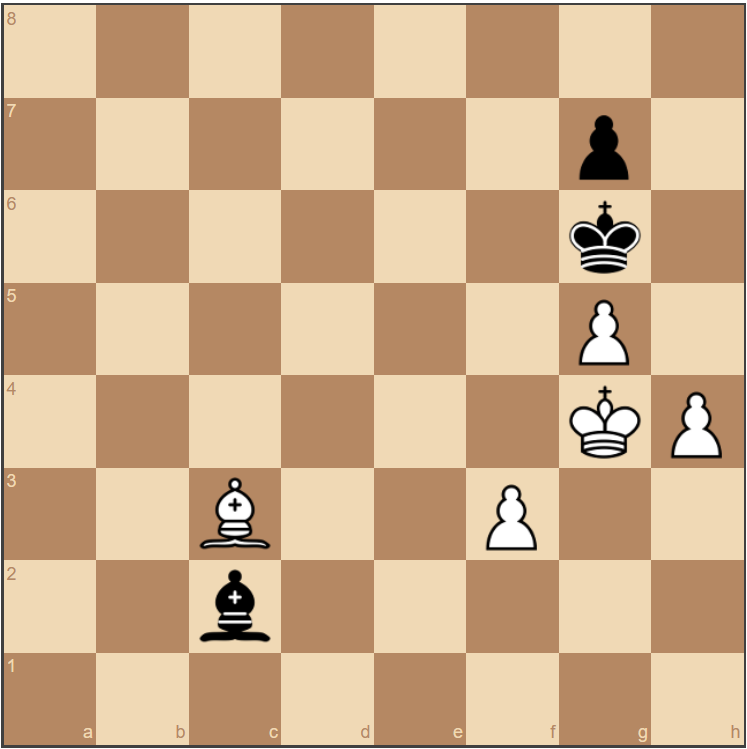
Bishop endings
Opposite-colored Bishops
If one side has connected pawns and Bishop vs Bishop, the key for creating winning chances is to keep the pawns on the same color of the opponent’s Bishop, thereby complementing your own Bishop. Their advance should always be in a way that keeps the possibility of re-establishing their stance in the squares of the same color as the opponent’s Bishop. The opponent, on the other hand, should try to force your pawns into squares of the same color of your Bishop, blocking their advance as soon as that happens.
Fortresses
Against Rook and Knight pawns, several fortresses are possible where the weaker side holds his own even without a Bishop against the opponent’s Bishop.
Knight and pawns vs Knight and pawns endings
Winning these endings often involves sacrificing your Knight, either to decoying the opposing Knight away, or in order to create an avalanche of pawns that the opponent can’t cope with.
Knight vs pawn endings
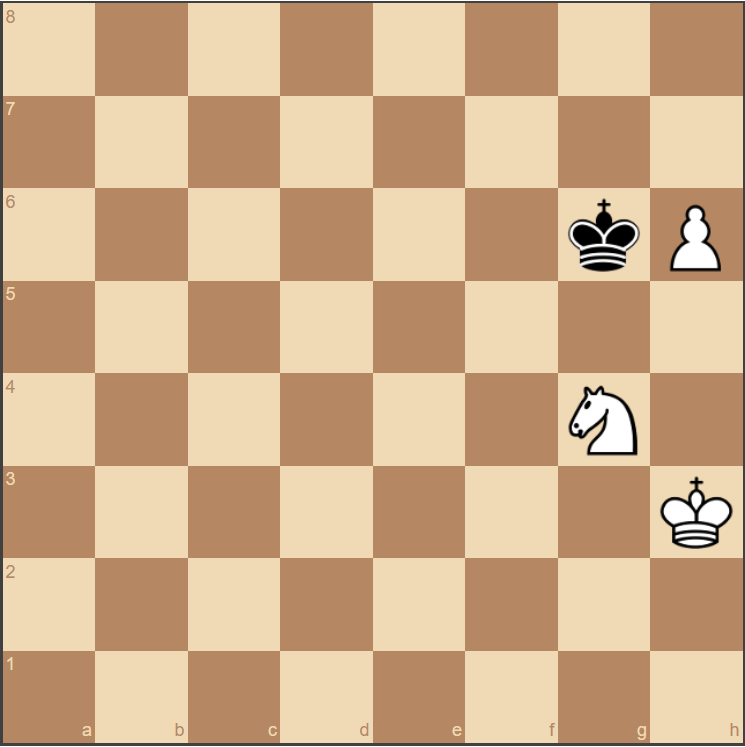
Knight vs Rook pawn
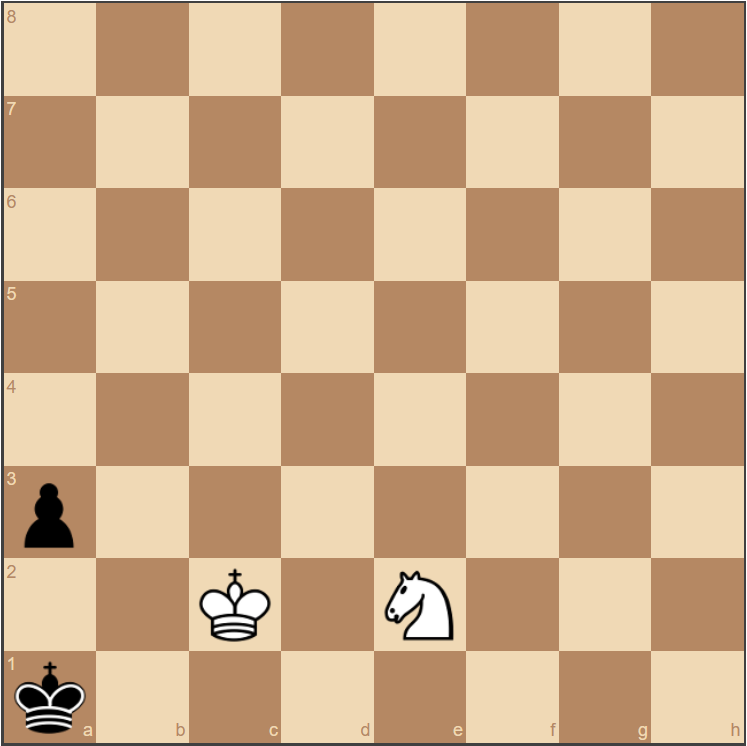
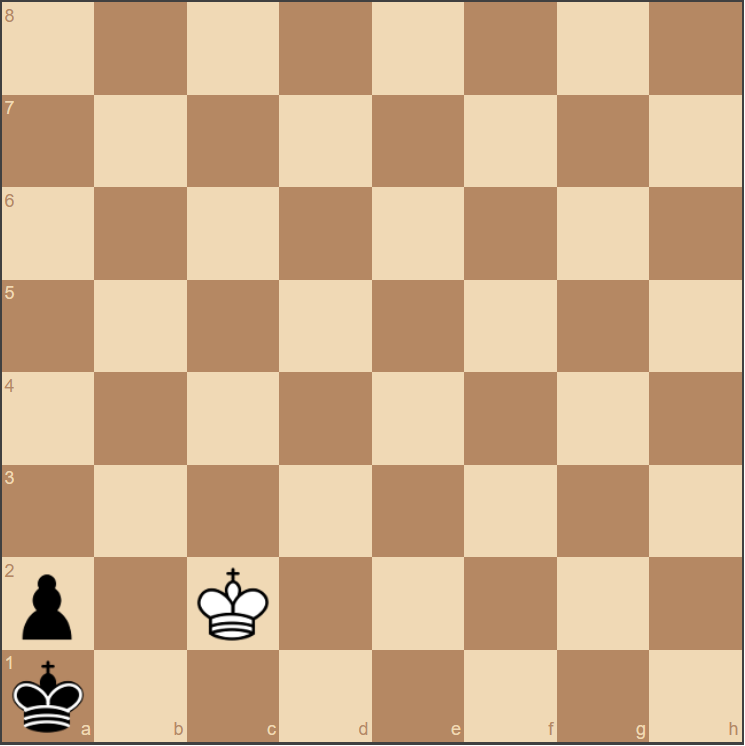
Can white win? Thanks to black’s pawn, yes!
There are a few positions where the side with the Knight manages to checkmate the side with the pawn. The general principle is worth knowing.
Click here to learn this endgame through an interactive, step-by-step tutorial.
Click here to practice this endgame.
Queen vs pawn endgames
Queen vs Rook pawn
Know winning and drawing instances.
Queen vs Bishop pawn
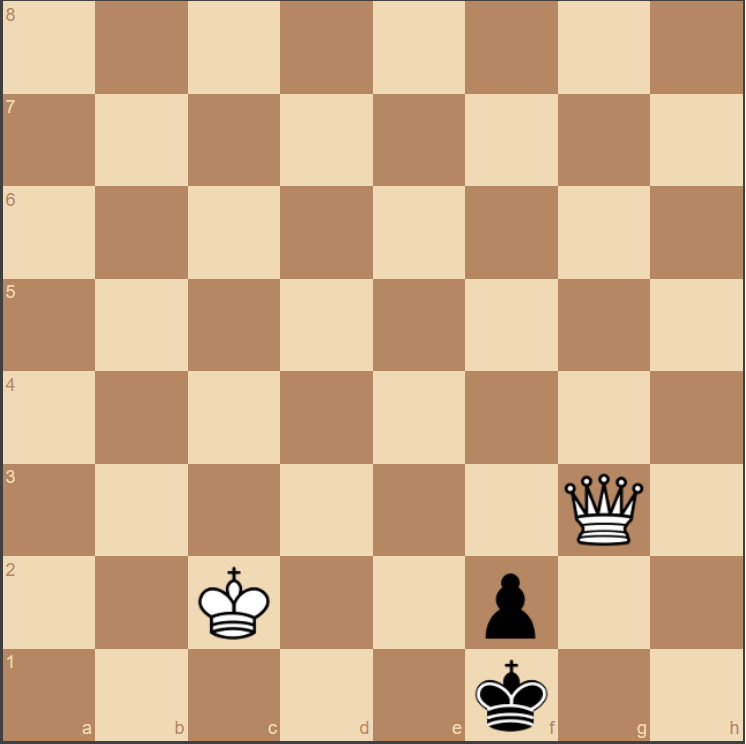
White wins thanks to his King’s close position.
Know winning and drawing instances. Here White to play wins.
Click here to learn this endgame through an interactive, step-by-step tutorial.
Click here to practice this endgame.
Rook vs Bishop
Defense
The King and Bishop fortress: here black’s Rook and King can make no headway.
You should know that you defend better by putting your King on the corner of opposite color to your Bishop, and keeping your Bishop handy by.
Attack
The black King is away from the right-colored corner. White wins.
The way to win is by trying to draw the enemy King towards the corner of same color as his Bishop.
Click here to learn this endgame through an interactive, step-by-step tutorial.
Click here to practice this endgame.
Rook vs Knight
Defense
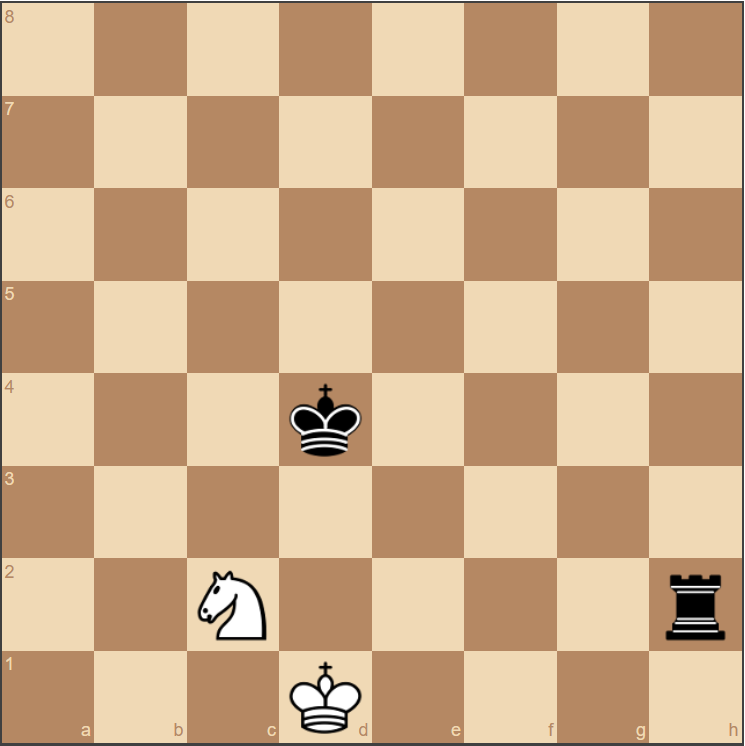
Close cooperation between King and Knight make sure the draw will be attained.
Never separate your Knight from your King.
Attack
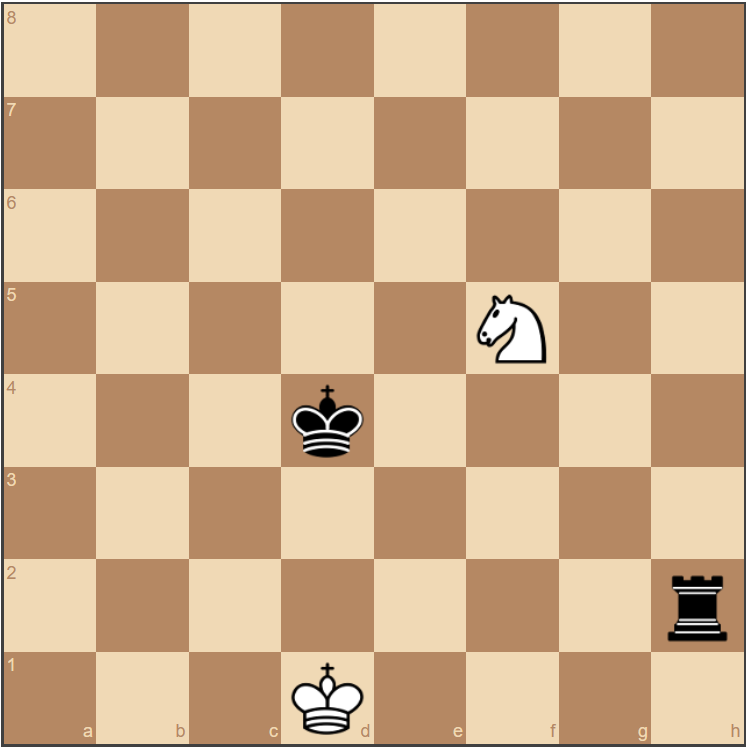
Black to play wins with Ke4, preventing the Knight from returning close to the King.
The antithesis of the defensive principle: strive to separate the King and Knight, know the winning maneuvers.
Expert (2000-2199)
Rook endgames
- A distinctive feature of expert-level play is confidence in a variety of Rook endings. Here are a few of them.
- Preventing a Philidor drawing maneuver: the side up a pawn prevents the defending side from putting his Rook in the sixth rank.
- Defending against two Rook pawns: when one side has two Rook pawns and Rook vs Rook, the weaker side can still draw provided that the stronger side’s King is not allowed to attain the promotion square of either pawn.
- Two connected pawns vs one: a series of positions where one side has two pawns and Rook vs just one pawn. Usually the side up a pawn should be able to win with extremely accurate play.
- Two connected pawns vs a blockade: sometimes the win is not simple, such as here. It’s worth knowing the right way ahead.
- Four pawns vs three on the King’s side: understanding the defensive maneuver for the side with less pawns and the winning attempts for the stronger side in this much-analyzed endgame is important.
Bishop endgames
- Same-colored Bishops: in several positions where one side is up a pawn, it can win by sacrificing its Bishop in order to clear the path for the pawn. This happens almost exclusively when the passed pawn is very far advanced.
Queen endgames
- Queen vs Rook and pawn: the weaker side can often establish a blockade to prevent the Queen from effecting a breakthrough.
Master (2199-2400)
Pawn endgames
Corresponding squares
An instance of many principles, this position illustrates how there are certain squares that if one side occupies with his King, the other side must answer by occupying a corresponding square. Opposition is a simple example of corresponding squares.
Although this principle is nothing more than a logical extension of the already looked at (and hopefully mastered) principles of key squares and mined squares, understanding them at a practical level requires some serious work. Basically, corresponding squares is a concept for situations where both King are far from the key squares of the pawn chains, and while both make their way towards these, they must follow a precise path lest they give the other the chance to outmaneuver them. Usually, such positions have a clear winner (or drawer) from the get-go, but calculating it effectively is a whole other ball game. Being able to calculate these endgames effectively is a sign of a master, sure enough.
Click here to learn this endgame through an interactive, step-by-step tutorial.
Click here to practice this endgame.
Principles of complex endgame play
For complex endgames -- that is, endgames that still have too much material about, and therefore have not been calculated to the end --, a series of important principles often rules.
These are principles such as:
The principle of two weaknesses
If you attack, the opponent defends. But if you manage to switch your attack to another weak point, the defending pieces will often be found to have a limited mobility compared to the attacking ones, which will make sure that the attacker gets his goal in at least one of the attacked points. The takeaway is simple: if you attacked in one wing and the opponent effectively defended, the key is opening another front in the other wing so that he will be overburdened.
The principle of strategic patience
In endgames where you have an advantage but no clear way to win, it pays to make your maneuvers as slowly and as long as possible, giving the opponent many chances to make mistakes. This plays on the psychological factor that defense in inferior positions is a lot harder task than trying to make headway if you are better; therefore, always give your opponent as many chances to make mistakes as possible while you try to work around his defenses.
The principle of conversion
It is fundamental to keep an open mind and realize that endgames with many pieces in them can be converted in simpler endgames of many kinds. For instance, when playing with Knights often the way to win is by sacrificing your Knight to enter a pawn endgame. These conversions are simple enough in principle, but in practice they require a change of paradigm that is not always so simple. Keeping an open mind and being imaginative, as well as having many examples in mind, is key.
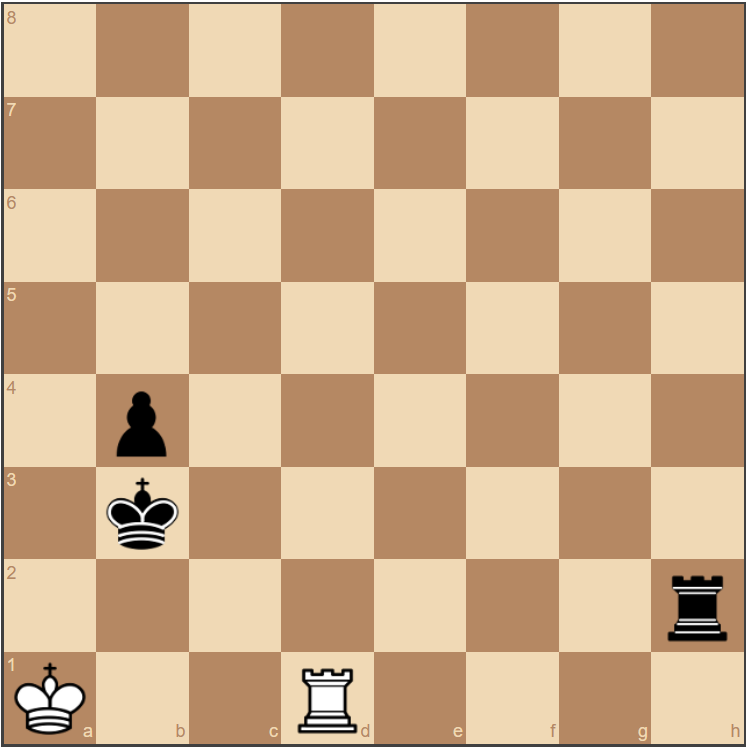
Rook vs pawn endgames
The pawn draws
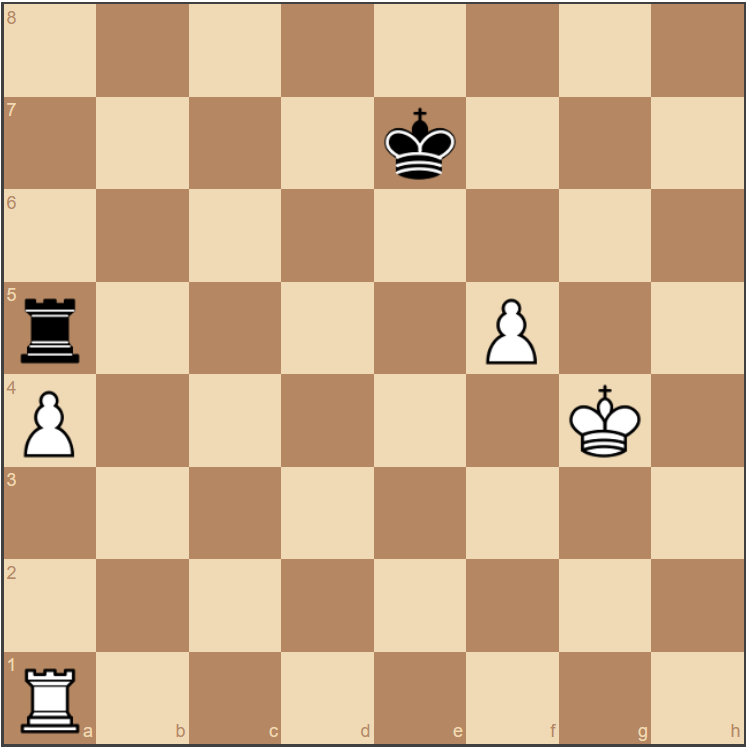
Black to play draws easily, but white to play and the pawn is unstoppable.
Knowing when a passed pawn will manage to fight off a Rook and get a draw, and when the Rook will have the upper hand, is fundamental.
Click here to learn this endgame through an interactive, step-by-step tutorial.
Click here to practice this endgame.
Rook and Bishop vs Rook
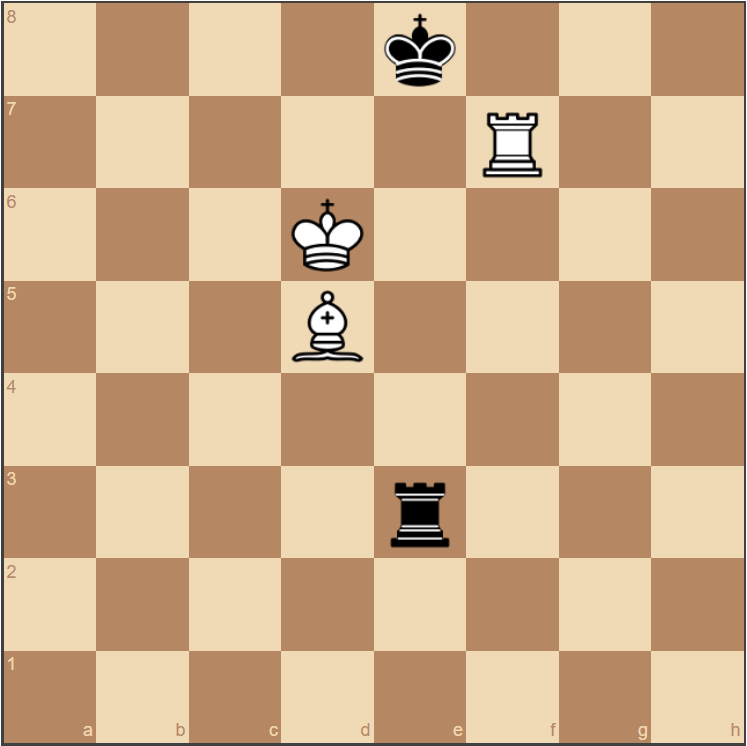
A complicated maneuver is required, but white can win once this position has been attained.
This is another endgame that will happen few times in your career, in all likelihood, but still worth studying and learning. It’s worth knowing how to win from the winning position, but most importantly it’s good to know how to defend if you find yourself as the weaker side, defending with the Rook.
Rook and Knight vs Rook
It’s important to know how to defend this endgame. While technically a draw, it’s easy to make a mistake and lose if you are playing with the lone Rook.
King, Bishop and Knight vs King

Another complicated maneuver which requires white to make the best of his Knight-Bishop duo.
Knowing this checkmate is not essential, since statistically speaking chances are you will never find yourself in need of this knowledge. However, the endgame is not so difficult to learn once you understand the essential concepts, such as that the checkmate can only happen in a corner square of the same color as your Bishop; understanding the key positions in which Knight and Bishop keep the King at bay, etc. All that said, it’s worth learning this endgame if you are at this level. There have been a few high-profile cases of a strong player not knowing what to make of this endgame and drawing when he or she could have won. Don’t add to the list.
Click here to learn this endgame through an interactive, step-by-step tutorial.
Click here to practice this endgame.
Queen vs Rook
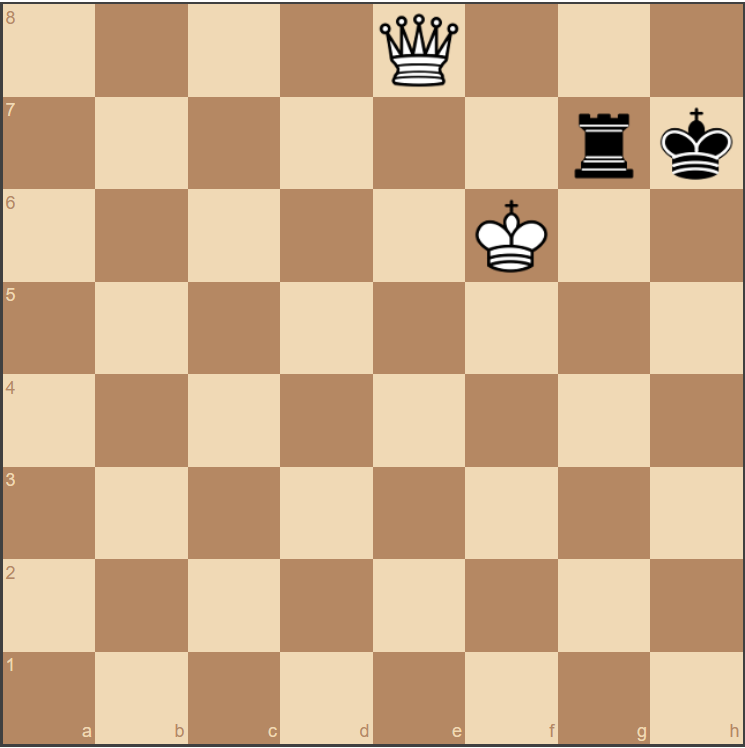
Another case where triangulation applies. White must give black the right to move in order to win.
Knowing how to win this endgame is essential, since it may be hard to find out in real time all the correct maneuvers against a strong player. Better learn them beforehand.
Click here to learn this endgame through an interactive, step-by-step tutorial.
Click here to practice this endgame.
Additional Resources
Books
Endgames are a vast field and endgame books must necessarily limit themselves to a more specific audience, so you should look for them according to what you feel is your current level. But that said, there are some great choices for all levels out there. Here are some of them.
If you are at an absolute beginner level (i.e., you know how to move the pieces but that’s about it), Bruce Pandolfini’s Endgame Course: Basic Endgame Concepts will prove invaluable in introducing you to the basic concepts in a gradual and thoroughly didactic manner. That said, this books goes quite a bit farther than merely a beginner level, and will present a lot of useful information for players up to a 2000 FIDE level.
Also very useful for an intermediary level is Jeremy Silman’s Complete Endgame Course. This book is divided into sections according to FIDE rating and claims to lead you to a 2400 level of endgame play. While I believe it comes a bit short of its ambitious claim, it’s definitely worth studying and it has the extra advantage of an easy-to-read layout, complete with synthetic definitions and bullet-point recaps.
Both of these books we just looked at focus a lot on specific positions and material balances. But going further, a more general and concept-based work is Mikhail Shereshevsky’s Endgame Strategy. This book assumes you already know basic endgames, including most pawn endings, and deals with the larger principles that rule chess endgames (as opposed to chess middlegames). Honestly, this book is an absolute jewel and the moment you pick it up and start studying it will be a happy one for your chess level. Among other things, it carries valuable insights into the psychological aspects of endgame as differing from the middlegame, and accordingly it emphasizes general principles such as “do not hurry”. This book will help take you far into the intricacies of a 2200+ chess level.
Finally coming to what is arguably the best endgame book ever written, we have Dvoretsky’s masterful Endgame Manual. Although the word Manual implies to many a basic level, this book is one that most Grand Masters out there can learn from. Most importantly, even though it’s not for absolute beginners it does span the Beginner-Advanced continuum in a way that no other book that I know does. Some would argue that this book is specifically useful for 2000+ players, but in point of fact you can start working with it as soon as you understand the basic checkmates (King and Queen vs King, Rook and King vs King, etc.). Rather than being divided into increasing levels of chess strength (such as the Silman book), Dvoretsky’s Manual is sorted into categories of endgame play based on material balances. So, for instance, the initial section deals with pawn endgames, then we proceed into minor piece endings, Rook endgames, etc. Within each section you learn in a gradual and perfectly didactic manner, beginning with the simpler concepts and progressing to very advanced ones. Dvoretsky’s style is easy to understand, and he makes sure to carry his points home with plenty of illustrations from actual games, including the amusing “tragicomedies” section, which provides plenty of useful cautionary tales. At the end of each section you are then tested with some key puzzles before proceeding onto the next chapter.
Last, but not least, if you are 2100+ you’ll probably benefit a lot from Lars Bo Hansen’s Secrets of Chess Endgame Strategy. I know, right! The titles of these books aren’t awfully creative! Regardless, this is an important book that will teach you how to play complex endgames — the ones that haven’t been solved by computers and are rather close to the middlegame. This book is likely useful enough for most Grand Masters out there, and Magnus Carlsen has reportedly been seen with it under his arm in a few occasions.
As a post scriptum, you should be aware that any endgame book by Aagaard or Yusupov should be more than worth your money. However, not having studied those I cannot go into more detail than to say that these are some of the greatest chess teachers/authors out there and every single book they author is a chess monument for posterity.