
Here’s another pawn structure article ready for you! This time, we are going to cover an interesting structure that is full of intricacies – the King’s Indian – Boleslavsky Wall pawn structure.
As you know, in chess there are seventeen essential structures. The display of pawns on the board may sound irrelevant to some people, but, as a chess aficionado, you already know that this shapes the character of the game to a great extent – and that by knowing each one of them, you will significantly improve your strategic play, and bring something new to the board in each game you play.
If the title of the article resonates something in you, it’s because you have already been through our previous article on a King’s Indian pawn structure: the King’s Indian – Rauzer formation article.
However, as you will see in diagram 1a very soon, if this structure recalls any other, it has to be the Maróczy Bind pawn structure, which you may have already encountered if you are a frequent visitor.
These similarities exist to show that pawn structures are dependent and related to one another, and that your knowledge of one of them is incomplete until you pair it with its sister structures or variations.
The time has come to sit down and start our journey around this structure, so assemble your chessboard and let’s get started!
What does the King’s Indian – Boleslavsky Wall pawn structure look like?
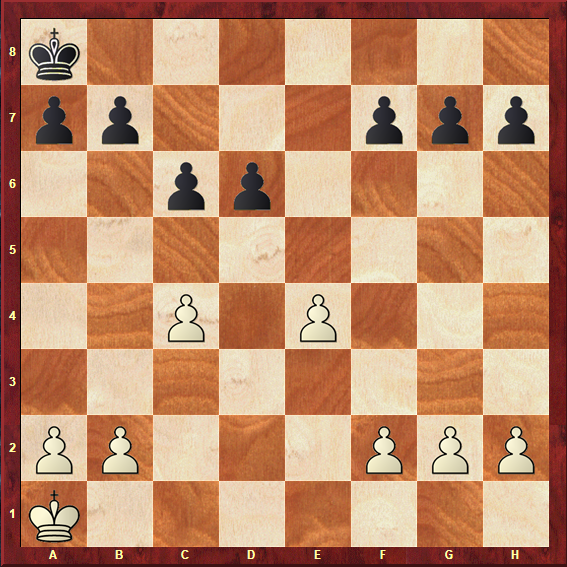
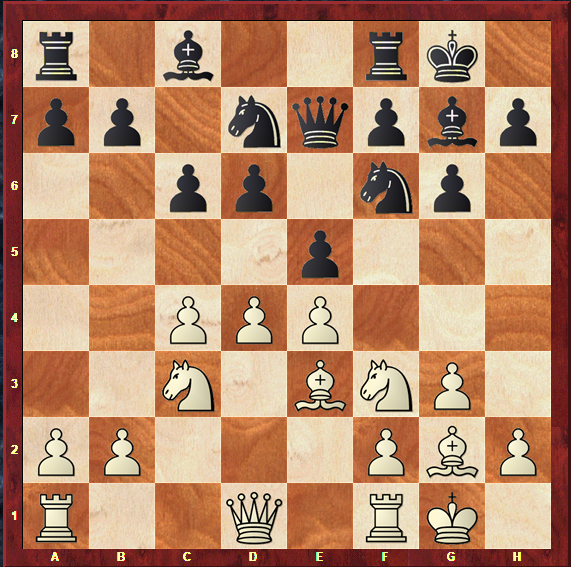
This is what the King’s Indian – Boleslavsky Wall pawn structure, also known as Open King’s Indian structure, looks like on the board.
Keep in mind that knowing exactly what a pawn structure looks like is the first step to fully knowing how to play it – and that’s what’s ultimately going to bring you to success.
As mentioned earlier, if the pawns on c4 and e4 ring a bell, it’s because you have already been through the Maróczy Bind pawn structure article.
Naturally, the placement of these two pawns in White’s field grant some similarities between these two structures; however, if you look carefully, you will realize that the main difference is that in the Maróczy structure, Black has exchanged the c-pawn for White’s d-pawn, while in this structure, it was the e-pawn that was exchanged for White’s d-pawn.
One thing that these two structures share as common ground is that undeniably, White has a space advantage.
However, as you may have read on our previous articles or found out for yourself over the board, a space advantage alone is not enough to claim a victory – White must know how to deal with it, and eventually transform it into a material or positional advantage in order to win the game.
In the meantime, Black has an important task: to make some room for his own pieces. A space disadvantage might be something tough to play with for many chess players who enjoy piece activity and tactical ideas – but fear nothing.
An essential concept of chess strategy is that the side who has a disadvantage in terms of space must look to exchange pieces. That is because once more pieces have left the board, there will be more room to maneuver and more squares to place those that have remained.
Also, White will try to do the exact opposite. Naturally, an advantage in space means that White has a lot of room to play with his own pieces, and exchanging them would obviously favour Black.
This is one of the most interesting battles that will take place on the board throughout any game in the King’s Indian – Boleslavsky Wall pawn structure.
If you keep this idea in mind, you already have a major guideline for your play, regardless of which side of the board you are standing on.
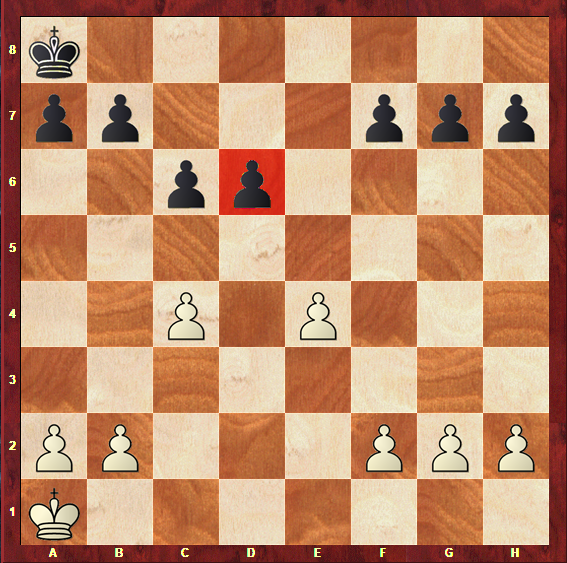
Take a look at the following diagram for a visual representation of White’s space advantage in this structure.

It is easy to identify that the two pawns on c4 and e4 offer White a strong control of the centre and a possibility to play on both wings.
Also, Black seems to have a few problems in developing his pieces, as the c8 Bishop is stuck due to the Knight on d7, and has no natural square.
However, of course Black has good things in the position; one of them is the typically strong Bishop on g7, controlling the great dark-squared diagonal.
If you are a player who actively searches for activity and space with the Black pieces, you might be asking yourself a logical question: why do people play this structure with Black?
There are a few reasons why.
The King’s Indian Defence is one of the most popular openings against 1.d4, 1.c4 and 1.Nf3. It is widely known for offering Black many chances to fight for the full point with tactical and interesting games. However, if you choose to have this opening as a part of your repertoire, there is no way to escape playing this structure every once in a while.
In addition to this, you should already know that a space advantage is not enough in itself, and that the game does not simply end there!
If Black plays the most accurate plans, he will find himself fighting for the full point right from the beginning of the game, and this seemingly calm structure can actually lead to a world of tactical adventures for both sides.
These are the real basics of the structure; but you need to dig deeper before you are able to play it with accuracy, and that’s where the next section comes in.
How do you play in this pawn structure?
This is when we start really discussing what to do with this structure, and this knowledge is what will ultimately turn you into a successful player of the King’s Indian – Boleslavsky Wall pawn structure.
Whether you are a King’s Indian Defence aficionado, a 1.d4 player with White, or just a chess enthusiast who enjoys to learn more and more about strategic ideas, stay around.
As you’ve read from the previous section, a strategic battle will take place on the board in most games deriving from this structure: Black will try to exchange pieces, and White will try to avoid it at all costs.
To be more precise, Black must create activity, play dynamically in order to continuously create threats and problems, one of them being the possibility of exchanging a few pieces to alleviate the space problem.
On the other hand, White must coordinate his pieces, also seeking activity and a controlling setup, while always keeping in mind that exchanging pieces will negatively affect his position.
As usual, we will see how both sides fight for a win in this structure by analyzing examples of games played by experts.
Let’s start by discussing major possibilities for White.
White’s plans
Many players find this structure extremely comfortable to play with the White pieces due to the natural space and development advantage.
However, this is a small advantage that may amount to nothing if White does not find the correct plans.
One thing we should note right from the beginning, together with the strategic battle we have just mentioned earlier, is that Black will very often have a weakness in his field.
This happens because in most cases, Black will want to push c7-c6 from very early on, in order to control the d5 square and inhibiting White to place a strong central piece in there.
Also, in some cases, this leaves a lingering possibility of Black coming to breakthrough with d6-d5, which should not happen if White effectively controls and dominates this idea.
This means, however, that the drawback of playing c7-c6 is that the d6 pawn will no longer be backed up by his mate on the next file, and could become a serious weakness for White to exploit.
A natural and effective plan for White is, therefore, to attack this weakness, for which the open d-file comes in quite handy.
Let’s analyze a rather old game, from 1998, but still pertinent to the knowledge of plans in this structure.
It was a game played in the Elista Olympiad between Grandmasters Vlastimil Babula and Mihail Saltaev.

When we are faced with plans whose main idea is to attack a given weakness, play willm most likely be slow.
This happens because, naturally, most weakness reveal themselves in the endgame stage, in which they will have less defenders.
In addition to this, in order to regroup pieces to attack a weakness, a lot of patient maneuvering is required, and that happens slowly throughout the middlegame stage.
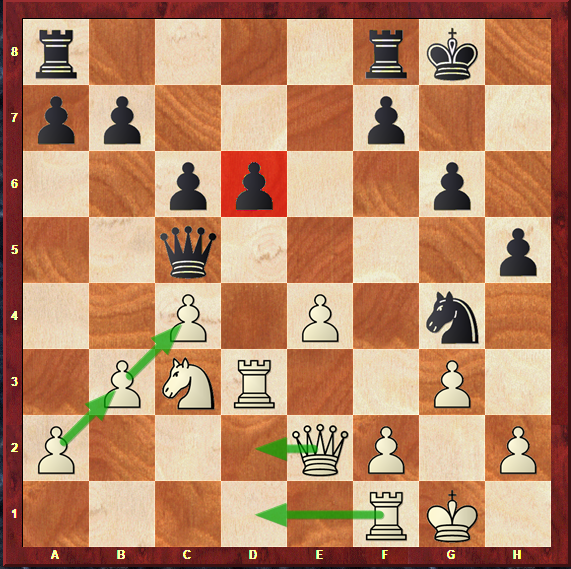
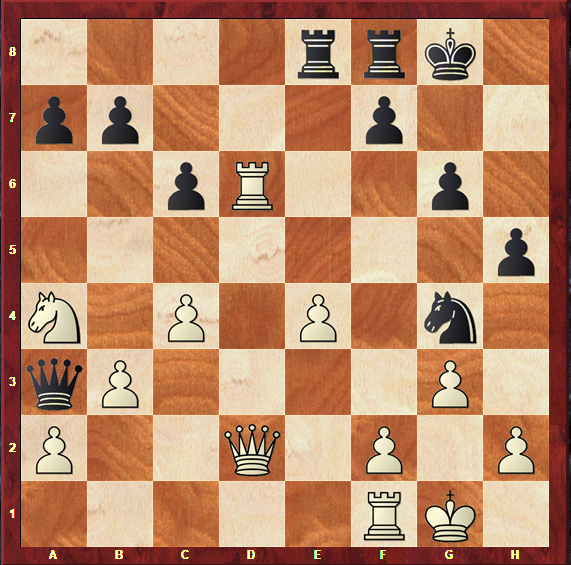
A few moves before the position in diagram 1d appeared on the board, Babula played what may look like a strange idea: to place the a1 Rook on the f1 square.
The idea behind this move is that he wants to defend the Kingside effectively, ensuring that Black has no way of becoming active and creating counterplay there.
Once that is controlled and that possibility is ruled out, he will maneuver his pieces towards attacking the d6 pawn.
Keep in mind that a weakness like this is something permanent. It will not disappear for the time being, so White knew he had time to take things slow.
The game went on:
- Rd3 Qe5
- g3 Qc5
- b3
Note how the Czech Grandmaster playing White takes the time to improve his position slightly each move.
First, he pushed g2-g3, a move that controls more squares on the Kingside and is aimed at the same idea of inhibiting Black’s counterplay.
Then, all the way across the board, he pushed b2-b3, creating a solid light-squared pawn chain that effectively supports the c4 pawn, attacked by Black’s Queen on c5.
It is not until a few moves later that we see White actually attacking the weak pawn on d6:
- b3 Rae8
- Na4 Qb4
- Qd2
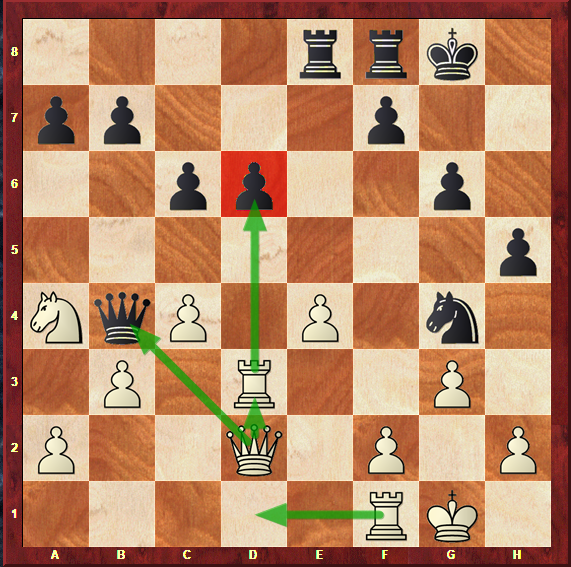
This elegant move by Vlastimil Babula deserves its own diagram.
Qd2 finally puts more pressure on the d6 weakness, after the position has been improved to the maximum on both sides of the board.
In addition to this, it offers Black the possibility of exchanging Queens. Black does not want this for his position: by exchanging Queens, the weakness on d6 would be more evident and harder to defend, and White would have a comfortable endgame with strong winning chances.
Mihail Saltaev knew it would be hard to stand his ground on this endgame, and therefore decided to avoid this exchange – at a very expensive cost….
- Qd2 Qa3
- Rxd6 – with a decisive advantage for White, winning the d6 pawn and the game in only a few moves’ time.
The game we’ve just seen is a perfect representation of how dangerous this plan can be for White, if carried out timely and accurately.
However, this is certainly not the only possibility for White in this structure.
While always keeping an eye on this weakness on d6, a strong idea for White is to expand on the Kingside with f2-f4-f5, sometimes even together with g2-g4.
This allows White to increase his space advantage even further, and sometimes create an attack against Black’s King.
As we are in a “classic game mood” in this article, let’s analyze another one from the 90s, this time from 1994.
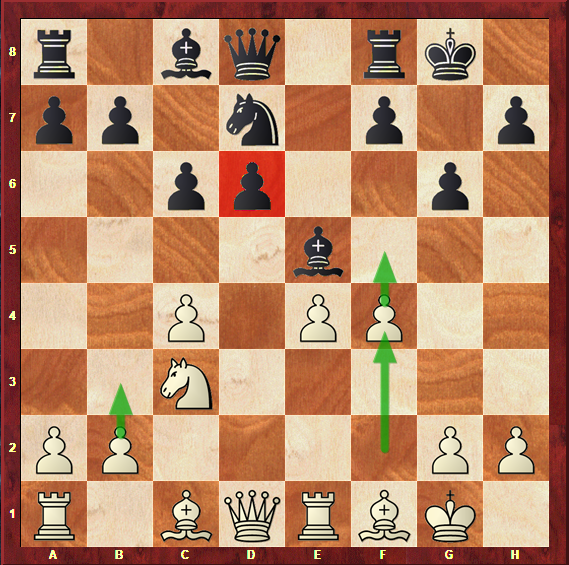
Diagram 1h depicts a position that was reached in the game Vaganian – Heinig, from the Bundesliga in the year mentioned above.
We start analyzing this game on move 13, in which White has begun his Kingside expansion by playing f2-f4.
This move is effective due to the reasons we have mentioned, but also because it gains time on the Bishop on e5. As it is attacked, it is forced to move: and a tough decision is already to be made by Black.
If he simply retreats his Bishop, White can take the d6 pawn and win material right out of the opening.
Therefore, the only other way to play is to take the Knight on c3, to prevent White from winning a pawn and a great advantage.
This is a big compromise. White gets the Bishop pair, and the dark squares in Black’s position will be weakened with the absence of the Bishop. This is an important thing to note, as White’s attack on the Kingside is undoubtedly stronger having all of the fragile dark squares to exploit.
Wolfram Heinig, playing Black, decided that the Bishop pair and positional advantage over the dark squares was easier to deal with than the immediate loss of a pawn, and continued playing:
- f4 Bxc3
- bxc3 Qf6
- Qd4 Re8
- a4
Rafael Vaganian, playing White, realizes that there is time to do everything in this position, as Black has no clear way of improving his pieces or generating active counterplay. Therefore, before carrying out the plan of Kingside expansion, he expands on the Queenside as well, creating more space by playing a2-a4.
A few moves and maneuvers later, the blow kicks in:
- a4 c5
- Qd3 Nb8
- Qg3 Nc6
- f5
The real expansion finally begins, and it does so under the best conditions. That happened only because White took his time and maneuvered slowly but surely, bringing the Queen over to help the attack and not rushing forward.
The weakened dark squares around Black’s King are becoming more and move evident, and White’s c1 Bishop is just a step away from exploiting them.
- f5 Qe7
- Bg5 f6
- Bf4 Ne5
- fxg6 hxg6
- Bxe5 Qxe5
- Qxg6+
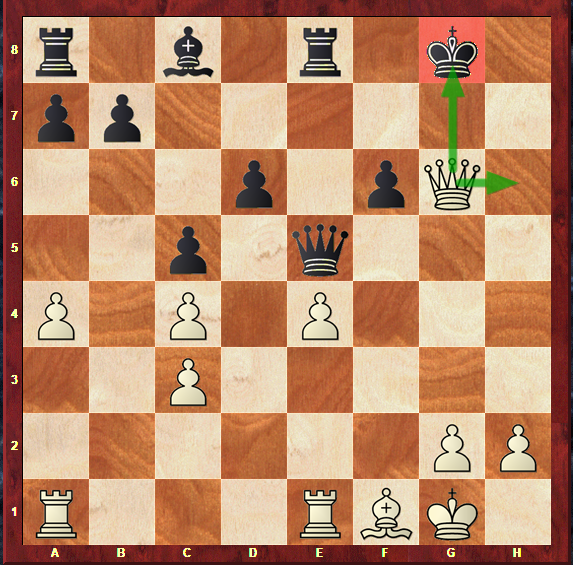
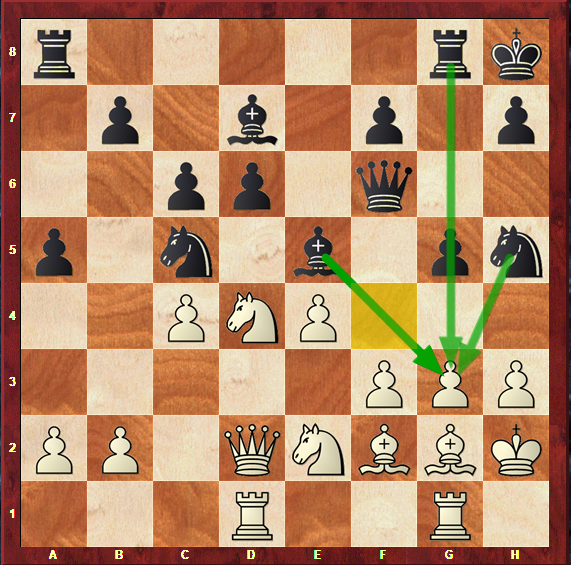
Diagram 1k: Vaganian – Heinig, 1994: Position after 24. Qxg6+.
After slowly moving back and forth before kickstarting the attack, it is clear that once it arrives, it arrives way too fast and with an unbearable strength.
White takes the g6 pawn, getting a material advantage and the possibility of harassing Black’s exposed King even further. Vaganian continued the attack in a natural way, and went on to win around 20 moves later.
To conclude in which concerns White’s plans in the position, let’s move from the 1990s to the 2010s and analyze another game in which White expanded on the Queenside, this time with the aid of the g2-g4 push in connection with the f2-f4-f5 idea we have just seen.
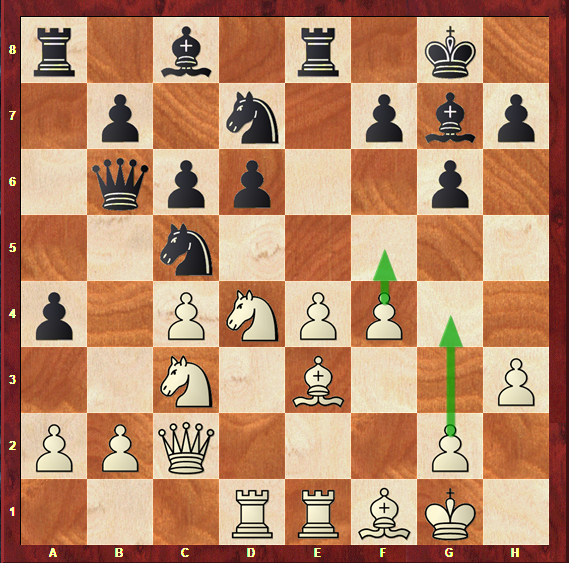
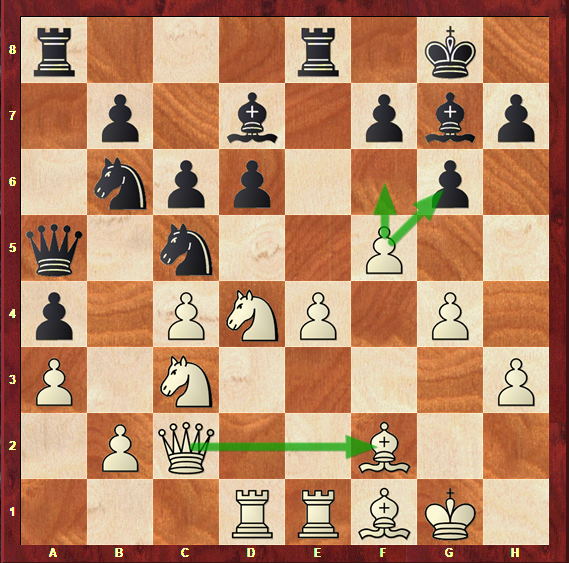
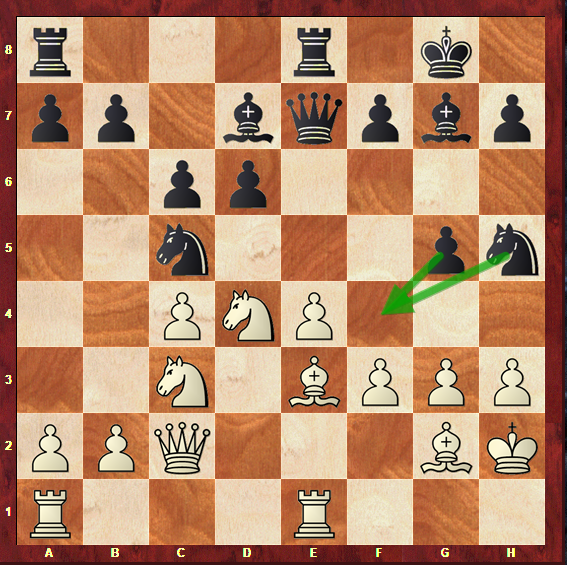
Diagram 1l has been extracted from a game played in the Lubbock SPICE Cup of 2011, between Grandmasters Georg Meier and Sebastian Feller.
We start analyzing the game on move 18, at the core of the middlegame, just when White begins expanding on the Kingside.
While in the previous game Black was passive and did not play in a cunning way, in this game that is not true.
As we will see once we cover Black’s plans, one of the main ideas is to expand on the Queenside when White expands on the Kingside. That way, Black may find some room for his cramped pieces and create threats and weaknesses in White’s field.
In this game, Feller, playing Black, tried to do this. We can see in diagram 1l that, as opposed to the last game, in which White took control over both wings of the board, Black has played a7-a5-a4 and generated some counterplay on the Queenside.
However, this counterplay was too slow and White has harmonious and well-placed pieces, which allowed him to go for a straightforward attack that was faster and stronger than Black’s onslaught on the Queenside.
- f4 Qb4
- Bf2 Nb6
- a3 Qa5
- g4

One thing to note about Black’s ideas of playing on the Queenside is that something like diagram 1m might happen: his pieces may be way too far away from his King.
It is only logical for White to actively expand on the Kingside if you look at Black’s pieces all the way across the board, leaving the King poorly defended.
- g4 Bd7
- f5
Black’s position is already tough to play, as the attack is quite fast and dangerous. White achieved a win on move 37.
If you are reading this section of the article but have the intention of playing the position with the Black pieces, don’t be scared or discouraged by these dangerous attacks: we will now see exactly how Black can fight back and create his own threats in the position.
Black’s plans
Playing a position in which the opponent has an advantage in space may not be every chess player’s cup of tea.
However, these positions are part of chess, and many of them are unavoidable when you play certain openings.
Since White has the first move, most openings will give him a slight advantage in space and a lead in development, and Black is always subject to this.
Therefore, learning how to play positions in which you have less space to move your pieces is essential for your growth and establishment as a chess player.
If you really wish to improve and climb up the rating ladder, you must be ready to play any position that might come up on the board – and that’s what these pawn structure articles are aimed at.
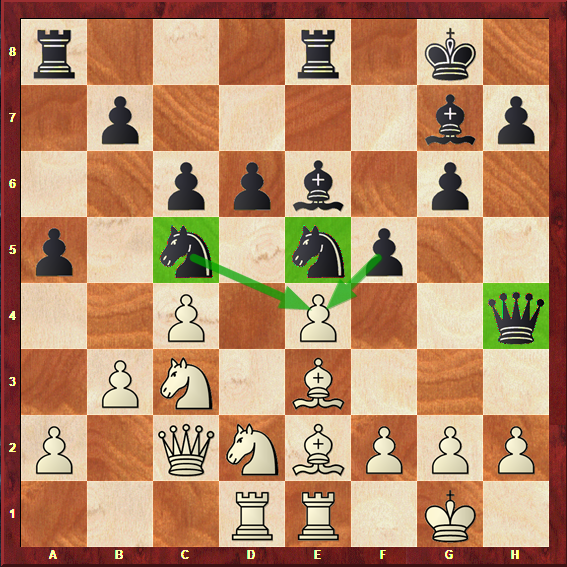
Let’s briefly start by looking at an example in which White overexpanded on the Kingside without taking adequate precautions and maneuvering pieces beforehand.

While it may seem logical to push f2-f4 while attacking the e5 Bishop, similarly to the position in diagram 1h, White’s pieces are not prepared just yet.
In diagram 1h, Black had an awkward Knight placed on d7, which meant that the d6 pawn was under the fire of White’s d3 Queen.
The fact that the Knight is no longer on that square also means that the c8 Bishop is ready to develop in only one move – which proves decisive for the game continuation:
- f4 Bxc3
- bxc3 Nxe4
If the Knight gets taken, the Bishop will come to f5 creating all sorts of threats in the b1-h7 diagonal, where White’s three major pieces stand.
Therefore, White can’t grab the Knight – which means that Black has just won a free pawn out of the opening, and indeed went on to win a smooth game in a total of only 28 moves.
Many players with the White pieces might fall prey to the excitement of expanding on the Kingside and attacking the enemy King, and make serious mistakes like this one.
You should always look out for active possibilities to exploit White’s overexpansion, even if the moves seem logical and coherent for your opponent.
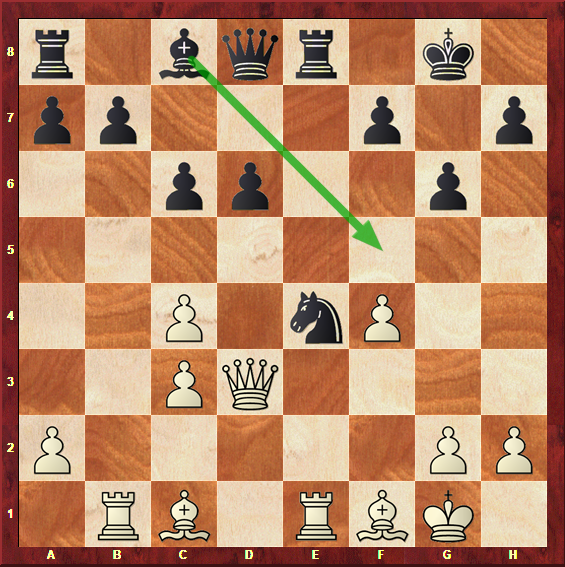
A similar example was found in the game Antic – Vorobiov, played in the Kavala open of 2010.
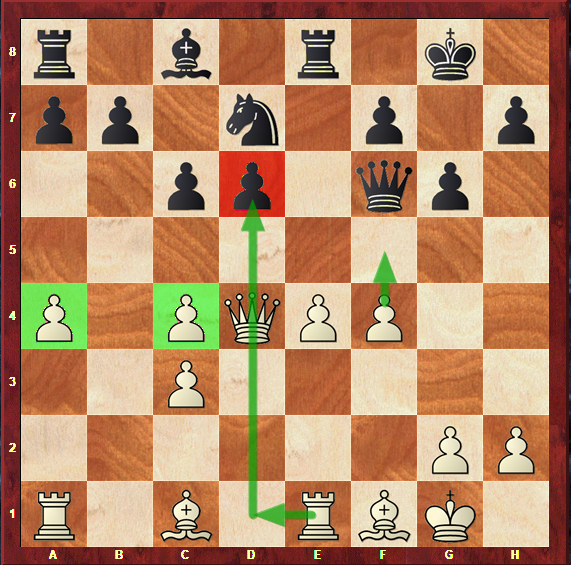
It is not by pure chance that White almost always plays b2-b3 in this structure; defending the c4 pawn is essential to maintain the control over the centre and the integrity of White’s pawn structure.
If White is careless and neglects this idea, Black may be able to exploit it as happened in this game:
- Be2 Nxc4
- Bxc4 Bxd1
- Rxd1 Qc5

The position is already very difficult for White, since three of his pieces are under potential attack: the c4 Bishop is directly threatened by the Queen on c5, and once it retreats, the g7 Bishop can take the d4 Knight. If White simply recaptures with the Queen, the g5 Bishop will be left undefended!
This is certainly a complex tactical idea, but in order to do well in these positions with Black, you must seek intricate and elaborate ideas in the position.
Other than reacting to White’s potential mistakes, there are other plans that Black can carry out in the King’s Indian – Boleslavsky wall pawn structure.
One of them is to breakthrough with f7-f5, a typical King’s Indian idea that you will certainly be familiar with if you are used to playing these positions.
The idea is to challenge White’s centre, prevent the Kingside attack and generate active counterplay.
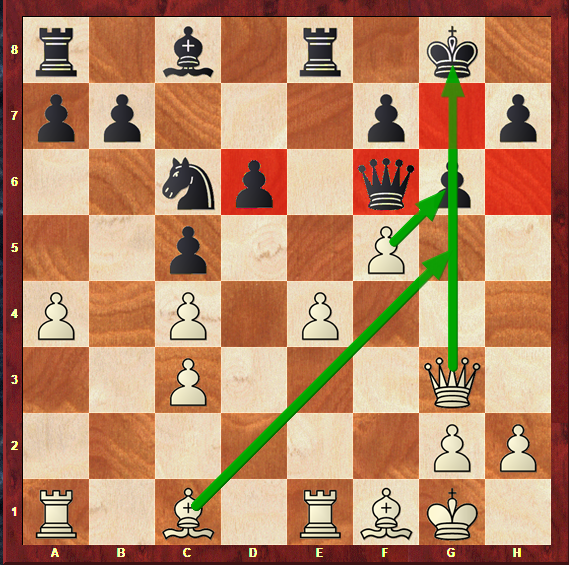
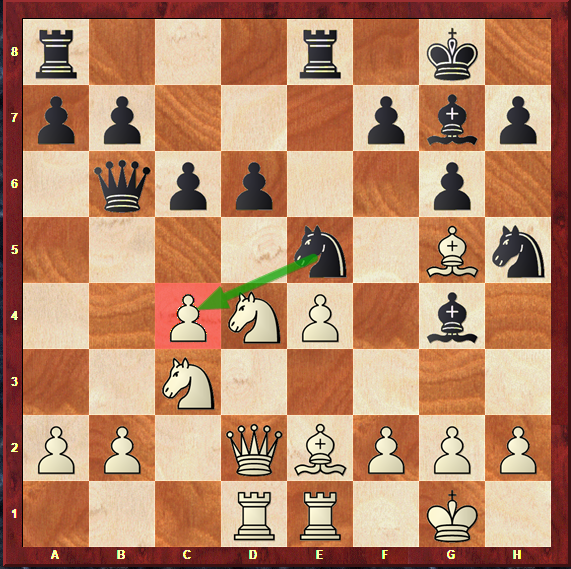
In the Bundesliga game between Grandmasters Christian Bauer and Luke McShane, a great example of how this idea may lead to complications in Black’s favor occured.
Black’s pieces are perfectly placed for this breakthrough. The Knights on c5 and e5 are exactly where they should be, and the Queen on h4 is very active.
A few moves into the game, we see Black grabbing a pawn and an advantage:
- f4 Ned7
- Nf3 Qe7
- e5 dxe5
- fxe5 Nxe5
Black is a pawn up and has ideally placed pieces, due to the strong central Knights and the support of the Queen and dark-squared Bishop on the long diagonal. Indeed, Luke McShane claimed victory in the end of the game, and proved how this idea may bring fireworks to the board.
Another somewhat rare and complex idea is to play g6-g5 in order to prevent White’s f2-f4 plan. This may not seem very sound in strategic terms, as it weakens the light squares around the King – it’s a bold move, and not one without its risks, but it may pay off if played at the right time.
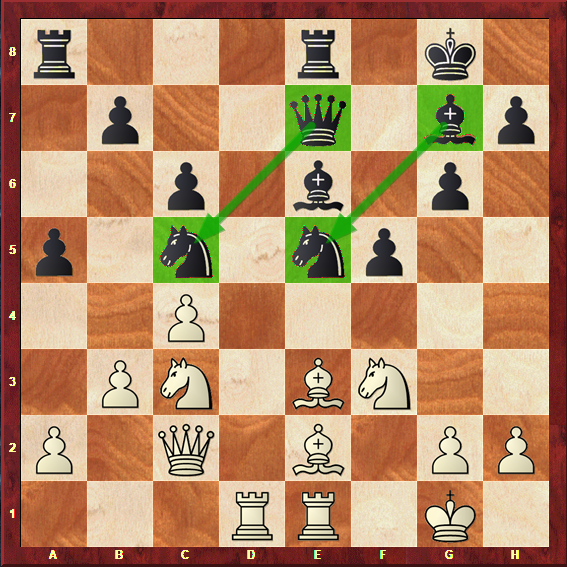
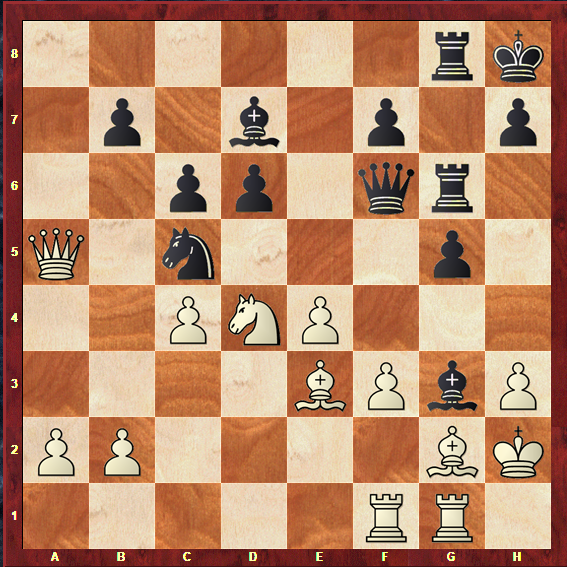
In the game between Stellan Brynell and Anastasios Pavlidis played in the Malta tournament of 2012, we see the perfect example of how the risk behind this idea can be compensatory for Black and bring him an advantage.
If you carefully look at White’s position, you will see that the pawn on g3 and King on h2 show that he had been preparing for the f3-f4 push and, consequently, the Kingside expansion we have seen in the coverage of White’s plans.
These ideas may be dangerous and leave Black tied down, while White exerts control over both sides of the board and puts pressure on Black’s weakness on d6.
A bold idea like g6-g5 can save the day for Black by bringing him the activity he would never have in White’s controlling setup.
The game went on:
- Rad1 Be5
- Bf2 Qf6
- Nce2 a5
- Qd2 Kh8
- Rg1 Rg8
Black builds up a controlling position slowly, similarly to what White does in his most traditional setup. The Knight, Queen, Bishop and Rook are looking at White’s King and stand in active squares.
White does not have a clear plan to improve his position, and tactical ideas begin to work in Black’s favor after:
- Rdf1 Rg6
- Be3 Rag8
- Qxa5 Nxg3
- Nxg3 Bxg3+
If White takes the Bishop, the following sequence takes place:
- Kxg3 Qe5+
- Kf2 Nxe4+
- fxe4 Qxa5, winning the Queen.
In the game, White saw this continuation and decided to retreat the King instead of taking the Bishop, which also leads to a triumphant ending for Black.
- Kh1 Rh6
- Nf5 Bxf5
- exf5 Qxf5
And White resigned in sight of the inevitable and indefensible Rxh3 threat.

And that’s a wrap in which concerns Black’s plans – hopefully now you realize that this position is rich and full of interesting possibilities for both sides, and not just for White due to his spatial advantage.
Since the information overload was quite big, let’s take a moment to summarize the plans for both players:
White’s plans
- Avoid exchanging pieces in order to make good use of the space advantage;
- Put pressure along the open d-file, targeting Black’s weakness on d6;
- Expand on the Kingside with f2-f4-f5 and g2-g4;
- Control the Queenside by playing a2-a4 or a2-a3 and b2-b4;
Black’s plans
- Exchange pieces to make White’s space advantage less worrying;
- Exploit the overexpansion of White’s, by putting pressure on the c4 and e4 pawns;
- Place Knights on c5 and e5;
- Dispute White’s control of the centre by playing f7-f5;
- Stop White from playing f2-f4-f5 by playing g7-g5, and sometimes create a Kingside attack out of it.
All of this information might seem enough to accurately play this pawn structure for both sides – it is indeed valuable, but there is a seemingly irrelevant question that makes a difference for any pawn structure…
How do you reach this pawn structure?
This is the last step before you know everything related to the King’s Indian – Boleslavsky Wall pawn structure: knowing how you might find it on the board.
That way, once a given opening is played, you will already know that there is a chance of coming across this structure, and can instantly start thinking about the plans we have covered earlier.
As the title indicates, the opening that brings us to this structure is the King’s Indian Defence. Particularly, this structure is reached when White does not push d4-d5 and Black ends up taking on d4 with the e5 pawn.
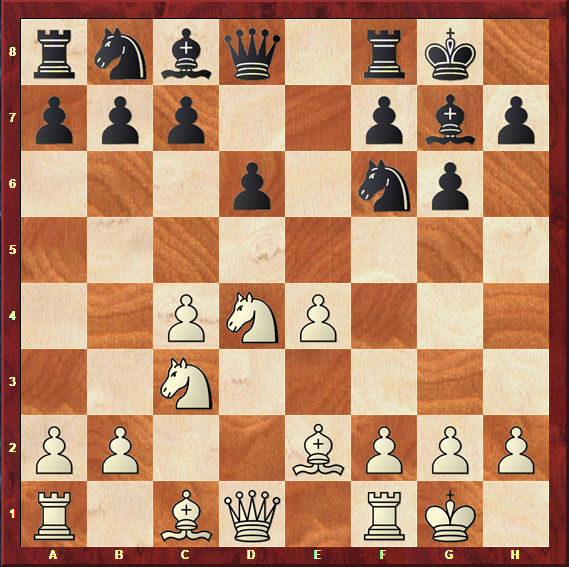
It can occur coming from many variations, and one of them is when Black decides to take on d4 early on, before developing the b8 Knight.
- d4 Nf6
- c4 g6
- Nc3 Bg7
- e4 d6
- Nf3 0-0
- Be2 e5
- 0-0 exd4
- Nxd4
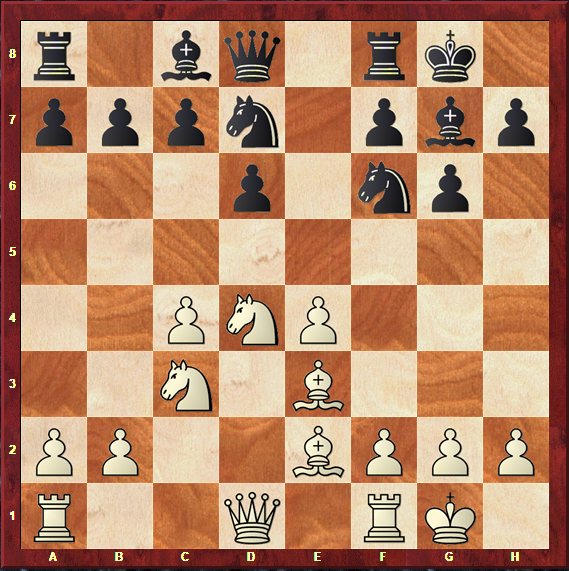
Another way to reach this structure is one move later, after Black has developed the Knight to d7 and White has played Bc1-e3, as pictured in the following diagram.
The Fianchetto Variation of the King’s Indian Defense may also lead to this structure after the following moves:
- d4 Nf6
- c4 g6
- g3 Bg7
- Bg2 0-0
- Nc3 d6
- Nf3 Nbd7
- 0-0 e5
- e4 c6
- Be3 Qe7
- h3 exd4
- Nxd4
As you can see, if you are a frequent player of the King’s Indian Defense, there’s no way to escape this pawn structure from every once in a while – hence why it is so important to know exactly what you are doing.
At this point, you are fully ready to outplay your opponent once it comes up on the board!
Let’s just take a final moment to draw a few conclusions, so that you can wrap it up in your head for the time being, or read them when you need to refresh your memory to prepare for a given game.
Conclusions
Another pawn structure article has come to an end, and you are to be congratulated for acquiring even more strategic knowledge – in time, your hard work will pay off!
At this point, you have already learned seven essential pawn structures in chess: there are still ten more to learn about, so stay tuned for more articles coming your way.
The King’s Indian – Boleslavsky Wall pawn structure offers chances for rich and interesting play for both sides. It might not be one of the most common structures in chess, but if you are an adventurous player who enjoys employing the King’s Indian Defense every now and then, it is absolutely essential for you.
These are the few points we must remember about this structure:
- The King’s Indian – Boleslavsky Wall pawn structure offers chance for slow maneuvering but also tactical adventures, for both sides;
- It may recall a similar structure, the Maróczy Bind;
- White has a space advantage and lead in development, mostly because of the e4 and d4 pawns;
- Black must fight back actively and dynamically, and exchange pieces to make the space problem less noticeable – White should not allow this;
- White will try to expand on both sides of the board, but more dangerously on the Kingside where an attack may take place;
- Black will try to fight against White’s expansion by placing Knights on the centre, and playing on the Kingside with either f7-f5 or g6-g5 to inhibit White’s play.
And that’s it – you’ve finished another one!
If you feel like there’s nothing else to do right now, check out one of our previous articles or play a few games, hoping to find this structure somewhere along the way so you can put the theory into practice.